In this article, we are going to demonstrate how to Integrate Google Sheet & WhatsApp using Picky Assist Connector to send recurring alerts like birthday greetings, payment reminders, anniversary greetings through WhatsApp.
Pre – Requisite
- WhatsApp Channel Activated In your Picky Assist Account
- A Picky Assist Plan which has access to Connector Feature
- Google Sheet (You should be the owner of the Sheet)
Google Sheet
Google Sheet is an easy to use online spreadsheet which allows businesses to collaborate with multiple teams, there are infinite ways the Google Sheets are used by businesses, in this article we will talk more about how to send WhatsApp messages from a Google Sheet using Picky Assist Connector.
What You Can Do?
You will able to send a WhatsApp message through Picky Assist Connector and can be used for the below usecases;
- Sending Birthday / Anniversary greetings when the day and month is matched to the current day
- Sending Billing Reminders before X days from the selected date
- Sending Billing Reminders After X days from the selected date
- Sending Billing Reminders on the due date
- Sending any type of periodic alerts when certain values in the google sheet column is true or false
How it Works?
We make use of Google Custom Script & Trigger to acheive this integration which give more flexbitly to customise the way you need to trigger the messages,
Now let’s consider you want to send a bill payment reminder before 2 days of it’s due date and your spreadsheet looks like as below where the due date is saved in the “Column H”
Now we want to perform an action of sending a message only if the Column H date is less than 2 days from the current date
Step by Step Video Guide On Sending Birthday Greetings
Getting Started
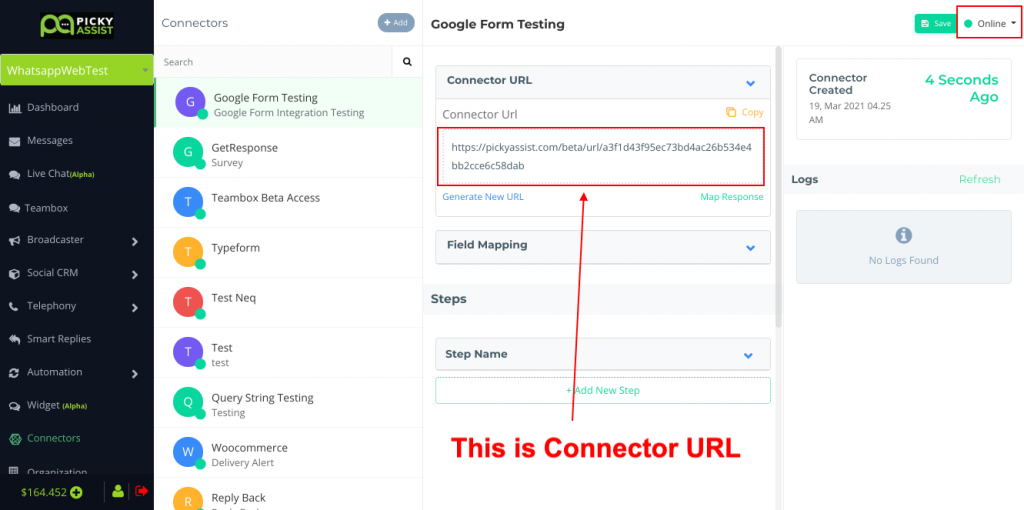
The first step is to go to Picky Assist and create a Connector URL, just make sure the Connector is in Online Mode to start accepting requests from Google Sheet whenever the specified column data is edited.
Setting Up Google Script
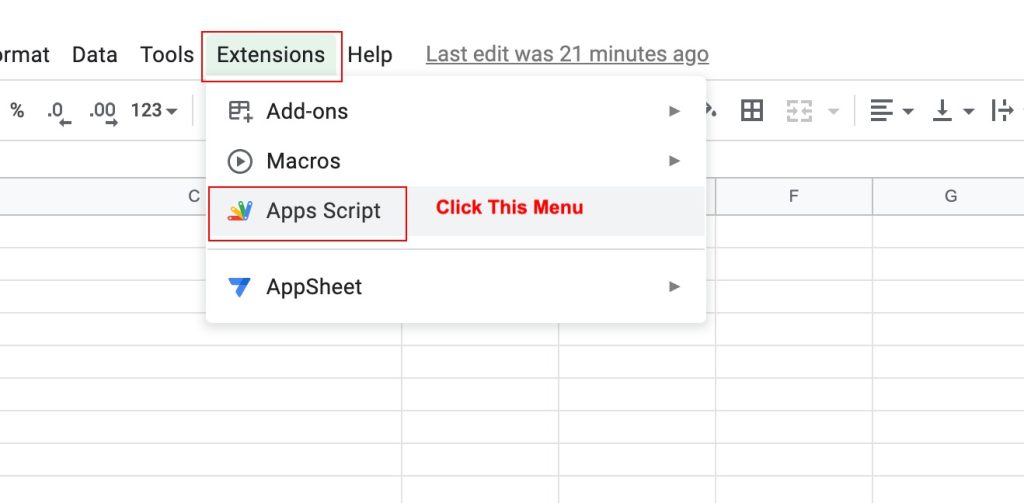
Open Google Sheet -> then navigate to the Extensions -> App Scripts as show below;
In the Code.js file just copy the below code and paste it
function PickyAlert() {

/***-- CONFIG --***/

  var TargetColumn = 'D';

  var SheetName = 'Sheet1';

  var date_offset = 0;

  var ignore_year = false;

  var ignore_month = false;

  var Triger_name = 'alert';

  var Triger_url = 'https://pickyassist.com/beta/url/029eee8c0332ceccbb28';

/****************************/


  if( TargetColumn == '' || Triger_url == '')
    return false;

  var tarCol = 0, length = TargetColumn.length;

  for (var i = 0; i < length; i++)
  {
    tarCol += (TargetColumn.charCodeAt(i) - 64) * Math.pow(26, length - i - 1);
  }


  if( SheetName == '')
    var sheet = SpreadsheetApp.getActive().getSheets()[0];
  else
    var sheet = SpreadsheetApp.getActive().getSheetByName(SheetName);


  var startRow = 1;
  var lastRow = sheet.getLastRow();
  var lastCloumn = sheet.getLastColumn()


  var timeZone = SpreadsheetApp.getActiveSpreadsheet().getSpreadsheetTimeZone();

  if( date_offset != 0)
    date_offset = date_offset * -1;

  var tarDate = new Date();
  tarDate.setDate(tarDate.getDate() + date_offset);

  var tarDate_Stamp  = tarDate.toLocaleString("en-US", {timeZone: timeZone}).split(',')[0].split('/');


  for (var i =startRow ; i <= lastRow; i++) {


    try{


      var ndate = Utilities.formatDate(sheet.getRange(i, tarCol).getValue(), timeZone, "M/d/YYYY").split('/');


      //if( tarDate_Stamp == ndate || ( ignore_year == true && tarDate_Stamp.slice(0, -5) == ndate.slice(0, -5) ) ){
      if( tarDate_Stamp[1] == ndate[1] && ( ignore_year == true || tarDate_Stamp[2] == ndate[2] ) && ( ignore_month == true || tarDate_Stamp[0] == ndate[0] ) ){


        var formData = {
            'triger_name': Triger_name
        };

        var range1 = sheet.getRange(i, 1, 1, lastCloumn);
        var values = range1.getDisplayValues();

        for (var j = 0; j < sheet.getLastColumn(); j++){

          var temp, letter = '';

          var column = j+1;

          while (column > 0) {
            temp = (column - 1) % 26;
            letter = String.fromCharCode(temp + 65) + letter;
            column = (column - temp - 1) / 26;
          }

          formData[letter] = values[0][j];

        }

        var options = {
            'method' : 'post',
            'payload' : formData
          };

        UrlFetchApp.fetch(Triger_url, options);
        delete formData;

      }

    }catch(err) {
      continue;
    }

  }

}
Now we need to update the values from line number 5 to 17 as per different requirements, below are the descriptions
See the below areas i.e 5 to 15 lines where you need to make changes as per your requirements.
| Fields | Description |
| var TargetColumn = ‘D’; | Here you need to update the column value in which the date is stored Please make sure the Column field data type it set as date and should have a valid date |
| var SheetName = ‘ ‘; | If you have more than 1 sheet then please specify the sheet name here |
| var date_offset = 0; | This the value to setup before or after the specified date, if you want to send a message when matching the current date then set it as 0 Set to -2 to send a message before 2 days from the date given Set to 2 to send a message after 2 days from the date given |
| var ignore_year = false; | true = the system will ignore the year i.e only consider the day and month, general usecase for sending birthday, anniversary, alerts which happens on a specific day and month false = the system will consider the year as well i.e it will validate day, month and year, good for sending |
| var ignore_month = false; | false = the system will ignore the month i.e only consider the day, general usecase is to send recurring messages like every month 7th send a reminder true = the system will consider the month also |
| var Triger_name = ‘alert’; | You can give a name to the trigger which helps you to identify from which function the data is getting passed to the Picky Assist Connector so that you can set up the automation rules accordingly, useful when you have more than one function in a sheet. |
| var Triger_url = ‘https://pickyassist.com/beta/url/e96ad4’; | This is where you need to copy and paste the Connector URL |

Make sure you are adding values correctly inside the quotes and don’t make any other changes in the script.
Now Click on the “Save” Icon to Save the Project, you can give any relevant name to the Project to identify it later
Setup Trigger in Google Form
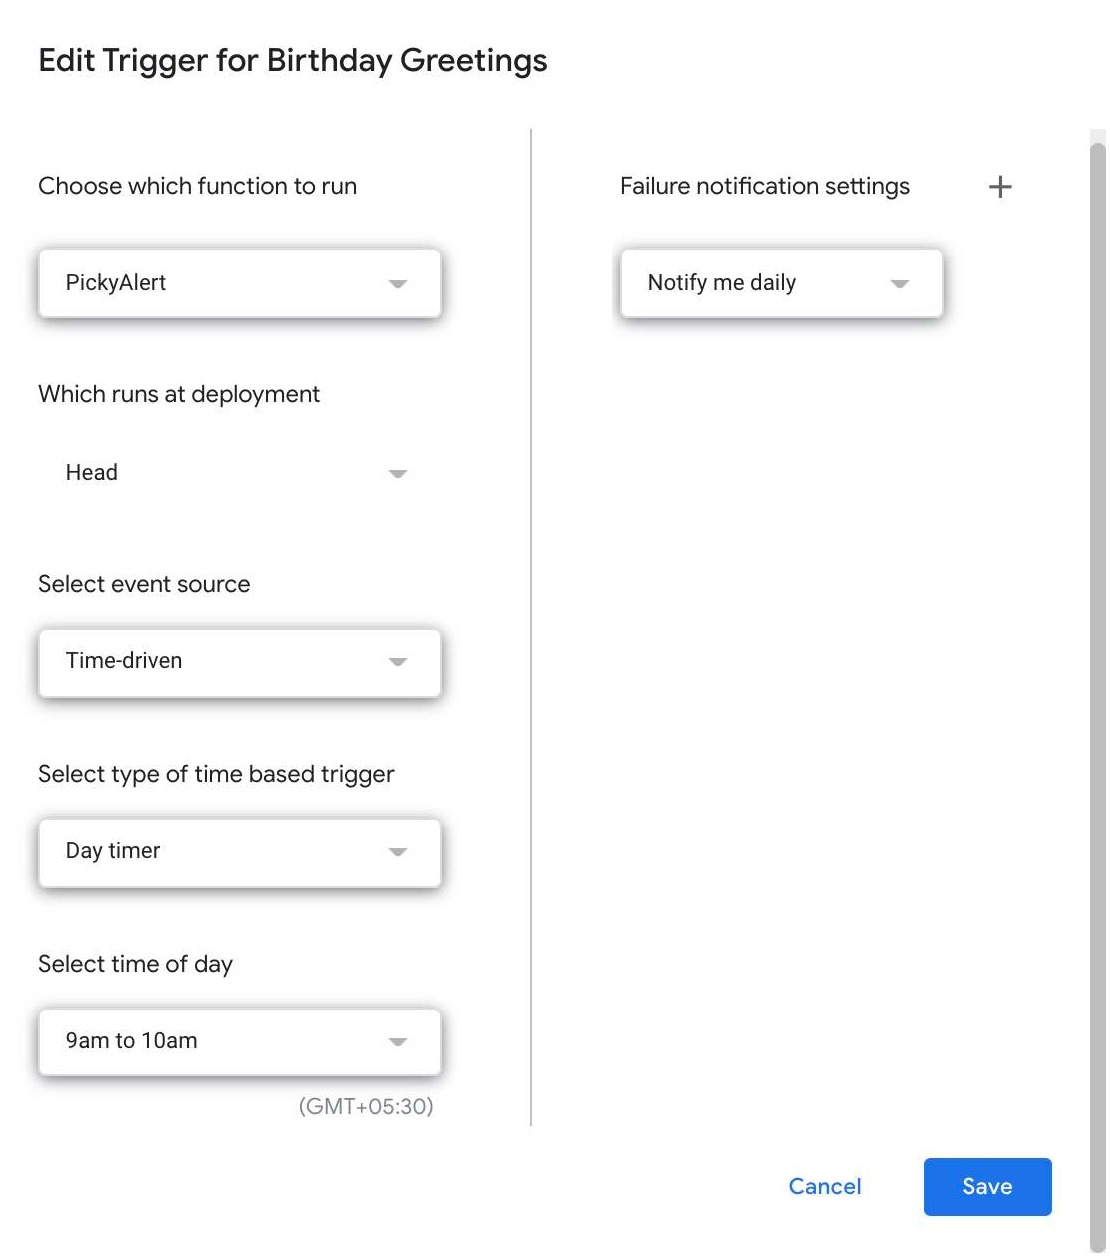
The next step is to Configure the Trigger in the Google Sheet so that every time google will trigger the code as per the schedule you configured, to do this select the trigger menu from the left side menu bar and then click on “Add Trigger” then configure it as seen in the below screenshot;
| Variables | Description |
| Choose which function to run | You have to select “PickyAlert” if you have only one function, you have the option to duplicate the function by giving a different name to the function and once it’s done you will able to see those functions in the drop down, this is useful if you have multiple functions in a script |
| Which Runs at Deployment | Always make sure it’s selected as “Head” |
| Select Event Source | Always make sure it’s “Time Drive” |
| Select type of time based trigger | This is where you will get below options to select when the script needs to be run, in our case we need to runs in every day so select “Day Timer” Specific date and time Minutes Timer Hour Timer Day Timer Week Timer Month Timer |
| Select time of day | Based on the above selection we will see different options, since we selected “Day Timer” now we need to select the time in which the trigger should execute You will get a wide range of time to select |
After that click on “Save” button and that’s it
Testing the Integration
Now to setup the integration we need to map the Google Sheet data with Picky Assist Connector so that it can perform conditions and actions based on the data received from the Google Sheet.
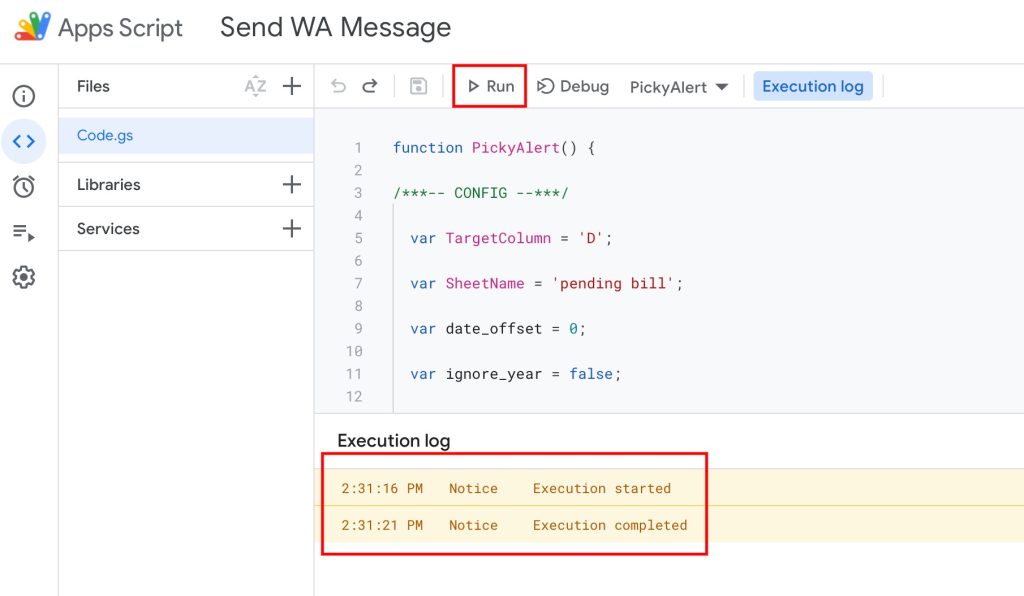
Open the Google Sheet and change the date to the current date in the targeted column, then go to Script Editor from Extensions -> App Scripts and click on “Run Icon” to run the script as shown below
Go to your Picky Assist Account then navigate to Connector, select the connector which was created for this Google Sheet then in the left sidebar you will able to see logs, this means Google notified the Picky Assist for the new update in the column.
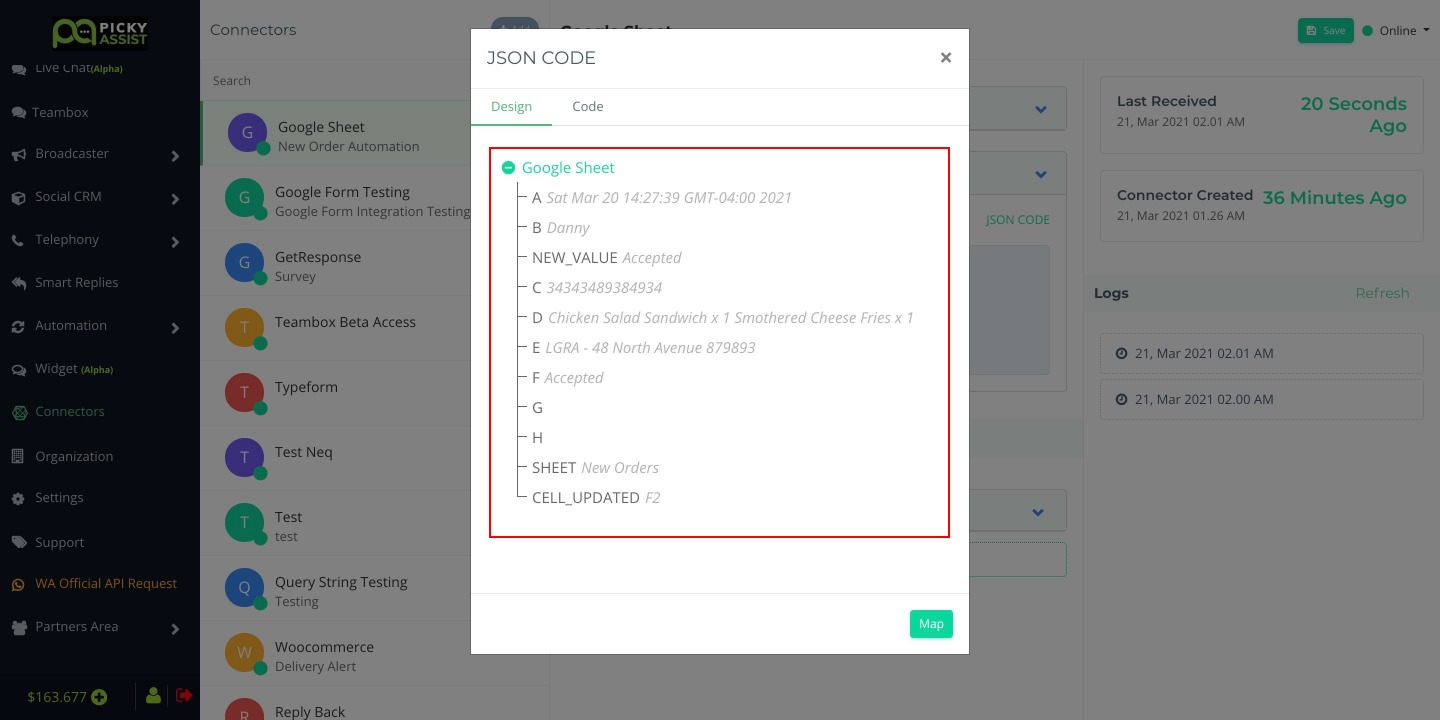
Mapping the JSON Data Structure
In order to map the JSON data structure go to “Field Mapping” then click on JSON Code from the popup you will able to see something shown as below;
If you are not seeing this option then please click on the “Code” tab then Click on “Map” button as shown below

Creating Steps
Now we need to create steps which take different action based on the value in the google sheet, in order to do this first let’s create one step with all necessary filter and action then duplicate the steps for ease the process,

Once a step is configured, we can simply take duplicates of the steps and change the filter condition value and message content
Important Notes
- If you add new columns to your Google Sheet then always make sure you have updated your JSON Code structure and steps accordingly so that you can able to make use of newly available fields in your connector.
- Kindly keep in mind that if you have more than one sheet in the spreadsheet please make sure you have given the Sheet name in which the data should be consider
- Once a trigger from Google Sheet to Picky Assist happens there is no way to recall it so please be careful while writing conditions and actions in the Connector.
Workaround & Tips
Below are the possible workarounds for various use cases.
Sending Message Conditionaly as per the Column data Values
There will be situation where you need to send the alert message only if certain values in a column is true or matching to a certain value, for an example that you want to send reminders only to those who have not paid the bill, so here in your spreadsheet there is a column name “Payment Status” and value is Paid, Not Paid, Blank etc
Now you can create a filter in the Connector Step to do the validations which sends message only if the Payment Status is “Not Paid” or blank or simply not equals to “Paid”
Now the system will send messages only for those whose “Payment Status” is not equals to “Paid” similarly you can combine multiple field data to check different conditions and perform actions.
Using the Script with Multiple Sheets
By default the script picks data only from one sheet however if you duplicate the script multiple times and change the script function name then it’s possible to use the same script for multiple sheets in a spreadsheet, follow the below steps to do this
Create a New File in the Script then copy and paste the script , after that change the function name i.e first line of the code function PickyAlert() to function PickyAlert1() Read More to Add Script
Now click on Save then create a new trigger with the settings you need and from the Function list select the PickyAlert1. Read More to Setup Trigger
Please note if the data structure for both sheets are different then you need to create 2 connector URL in the Picky Assist and update the Connector URL in the Google Script.
Don’t see what you are looking for? Don’t worry we will provide you with a custom Google Script to make it happens, just send an email to support@pickyassist.com detailing your requirments.


Add comment