In this guide, we are going to explore the possibilities of integrating WhatsApp with Mailchimp using Picky Assist Connector.
Pre-Requisite
- WhatsApp Channel Enabled Picky Assist Account
- Access to Picky Assist Connector
- Mailchimp Account with Admin Privileges
About Mailchimp
Mailchimp is a powerful email marketing/newsletter platform which helps businesses to send targeted, personalized email messages like a newsletter, marketing to an opt-in database, they offer easy to build signup forms that can easily integrate into any website/blog.
Capabilities with Picky Assist Connector
When you connect your Mailchimp account with Picky Assist Connector you can achieve below mentioned capabilities to enhance your communication with your customer’s
- Send A WhatsApp Message When A Campaign is Started
- Send A WhatsApp Message When New Subscribed is Added via Signup Forms, API, Manually
- Send a WhatsApp Message / Start a WhatsApp Drip Campaign when a form is filled and submitted.
Primarily you will able to take actions/perform condition in the Picky Assist Platform when any of the below events happens in your Mailchimp Platform, below are the list of events Mailchimp Supports now
- Subscribes
- Unsubscribes
- Profile Updates
- Cleaned Address
- Email Changed
How It Works?
Picky Assist Connector makes use of the Mailchimp inbuilt Webhook module to listen the real-time event alerts from the platform and then based on the event type you will able to create a filter and relevant action to be taken.
Getting Started
The first step is to go to Picky Assist and create a Connector URL, just make sure the Connector is in Online Mode to start accepting requests from Mailchimp whenever the subscribed event is triggered.
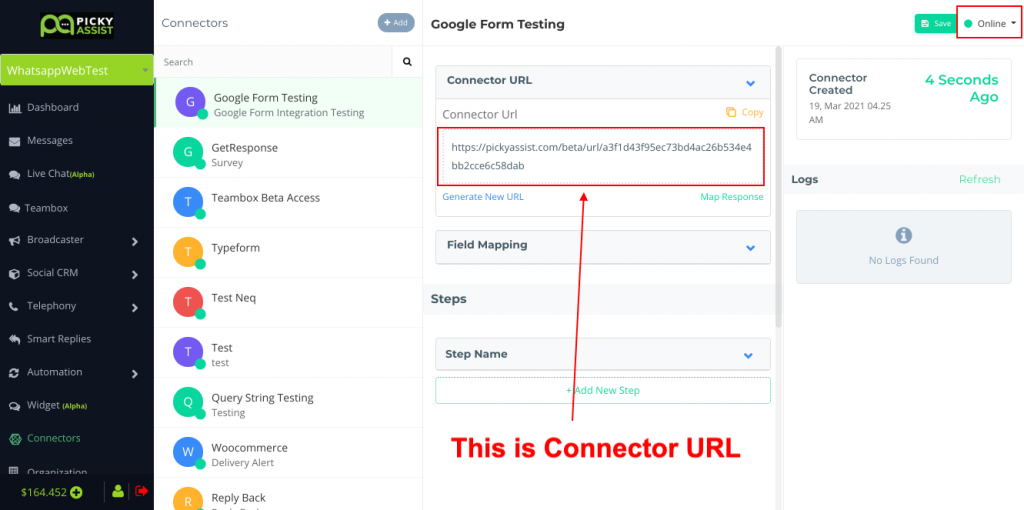
Creating Webhook
Now, we need to create a webhook for getting event updates, i.e whenever an event happens in the Mailchimp Picky Assist will be notified through Webhooks about the event and the Connector will perform the steps configured by you.
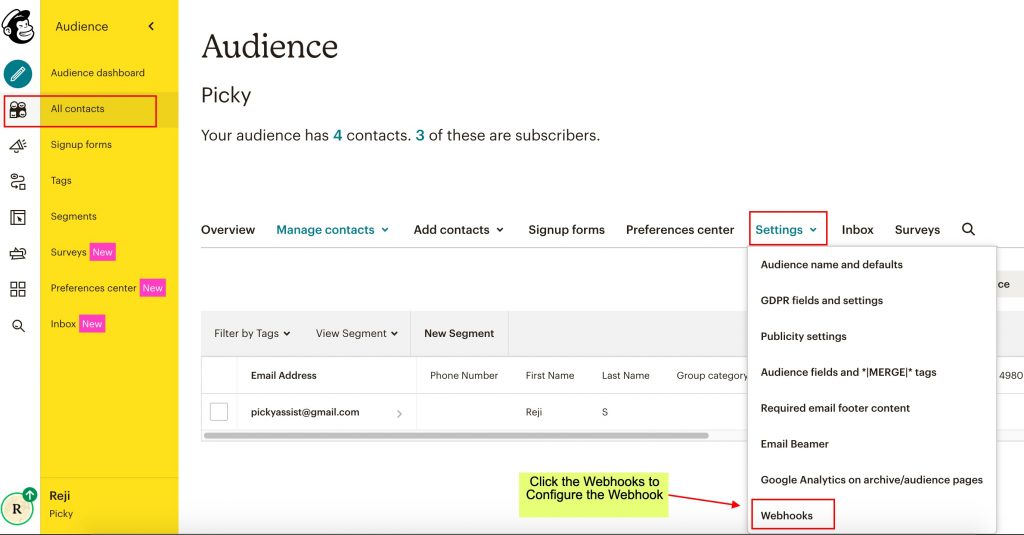
- Log into Mailchimp and navigate to Audience
- Select the audience you want to work within the Current Audience dropdown
- Click the Manage Audience dropdown button and select Settings
- On the Settings page, click Webhooks
- Click the Create New Webhook button
- In the Callback URL field, add the URL of the integration or application where you want to send webhook requests—this URL will receive data about your Mailchimp audience
- Select the boxes next to each update type to choose the events that will trigger your webhook—in this guide, we’ll choose Subscribes and Unsubscribes
- Click Save to save your new webhook
Subscribing to Event Types
You have the option to subscribe only to the specific event type that needs to be sent to Picky Assist Connector, based on your requirements you can select the event type as shown below;
You can subscribe to multiple events by creating more webhooks with same Connector URL or different Connector URL and make use of the Filter tool & Router to filter the event value and route to the right step or connector in the Picky Assist Connector as per your requirements.


Add comment