
We will learn how to integrate a Trello Board with WhatsApp through Picky Assist Connector Using Trello Butler (Automation)
Step by Step Setup Video
Pre-Requisite
- WhatsApp Channel Enabled in Picky Assist Account
- Access to Picky Assist Connector
- Trello Account (Free or Paid)
About Trello
Trello is very popular Task / Project Management Platform known for it’s easy to use Board, List & Card features
Capabilities with Picky Assist Connector
When you connect your Trello account with Picky Assist Connector you can achieve below-mentioned capabilities to enhance the business communication with your customer’s
- Automatically Send A WhatsApp Message to A User when a Card is moving from One List to Other like “Order Processing” to “Order Delivered”
- Automatically Alert an Internal User when a Card Moves to a Specific List, like when a card is moved to a list named “Completed” Send a WhatsApp Message to the Owner of the card informing that the task is done
- When a Card Label got changed or updated Send A WhatsApp message to a specific user like when a label is changed from “In Progress” to “Done” Send a WhatsApp Message to a specific member
- When A List is Added or Marked As Completed Send A WhatsApp Message
- When an incoming message comes to WhatsApp Create a new Card in a specific list in the board
- When a incoming message contains certain words like “help, support,call back” create a card or update the incoming message as comment in the card activity
Supported Triggers
Below are the complete list of Supported Triggers in Trello Automation (Butler) where you will able to take different actions using Picky Assist Connector.
Card Moves
- When A Card is Added to A List
- When A Card is Added to a Board
- When A Card is Archived / Unarchive
- When a List is Created
- When a List have more than x Number of Cards
Card Changes
- When a Label is Added / Removed in a Card
- When a Attachment is Added / Removed in a Card
- When a Specific User is Added/Removed from a Card
- When a Vote is Added / Removed in a Card
Dates
- When a Due Date is Marked As Completed / Incomplete
Checklists
- When a Checklist is Added / Removed to a Card
- When a Checklist is Marked as Completed / Incomplete
- When an item in a checklist is Checked / Unchecked
- When an item is added / removed in a Checklist
Card Contents
- When the name / description of the card starts / ends / contains a specific value
- When a comment is posted into a card
- When someone is mentioned in a card
Fields
- When All the Custom fields are completed
- When a Specific Custom Field Value Change / Update
How It Works?
Picky Assist Connector makes use of the inbuilt Automation Feature of Trello called “Butler” you can create simple or advanced automation using Butler and in the Action you can send a “HTTP Request” from Trello to Picky Assist Connector further in the Picky Assist Connector you can create various Actions like Send A WhatsApp Message, Add User into a WhatsApp Group etc
Watch Video How Butler Works
You can find more Videos in Youtube to learn more about how Trello Automation Platform Butler works https://www.youtube.com/results?search_query=trello+butler
Getting Started
The first step is to go to Picky Assist and create a Connector URL and get ready with the Connector URL – Read More on How to Create a Connector
Create A Automation in Trello Butler
Kindly refer the above video’s on how you can create an Automation with Trello Butler, what we will show here how to Set an Action in the Trello which post an event to Picky Assist Connector using the Trello builtin HTTP Request Action
Once A Trigger is Created in the Automation you have to Set an Action, kindly follow the below steps to set a “HTTP Request” as action;
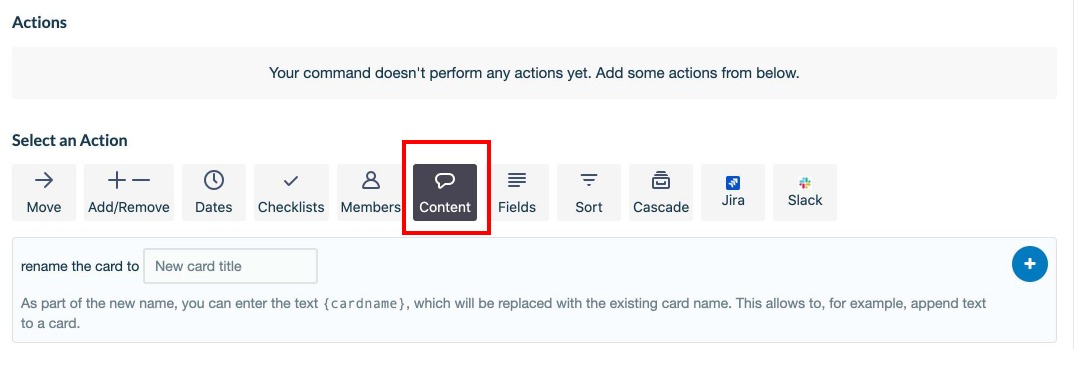
Click on “Content” then move to last option as shown below;
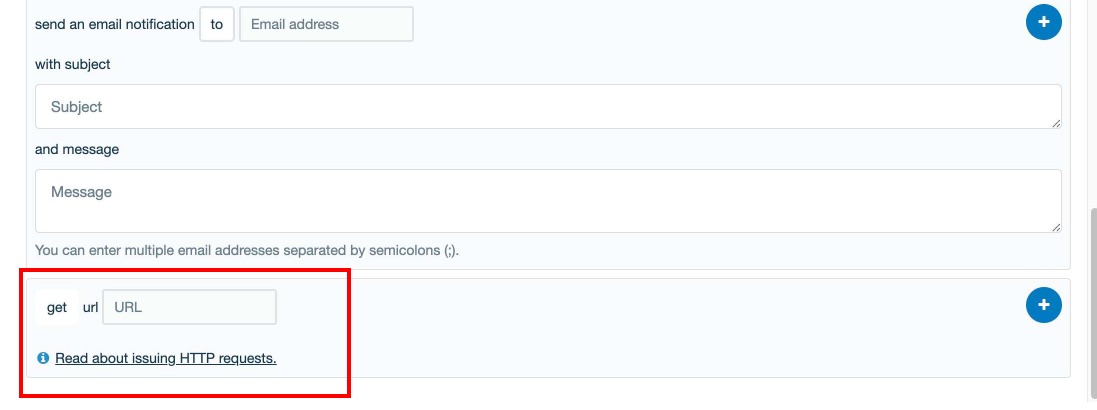
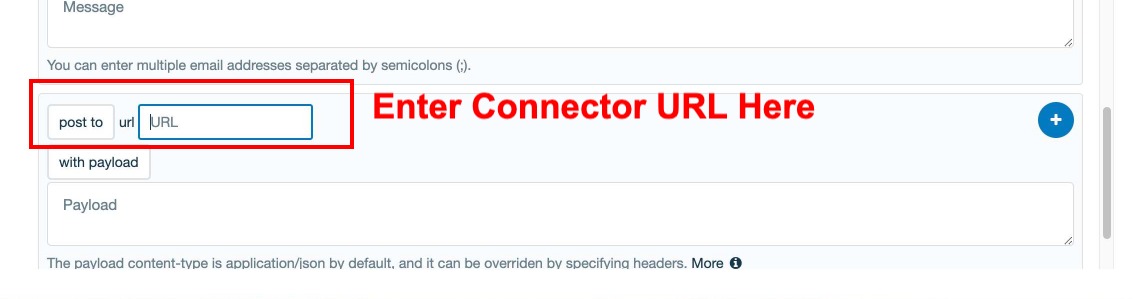
Now Click on “get” and it will show and option “post to” and enter the Connector URL as shown below;
Passing Trello Data Values
In order this automation to work you need to pass the Trello data values in variables appended to the Connector URL or for advanced Users can use JSON as Payload, we will discuss here how to pass the trello values through variables along with the Connector URL
Let’s assume your Connector URL is https://pickyassist.com/beta/url/410474eb24ec757b5545d7c17eaec992c18b
and you need to pass following details to the Picky Assist Connector from your Trello Board
Card Name
Card ID
So we will construct a query as card_name={cardname}&id={cardid} if you wish to add more values you can add & then give a variable name = {bulter variable name} i.e in simple separate a value with &
Now this query needs to be appended to your Connector URL, add ? at the end of the Connecting URL followed by the query as shown below;
https://pickyassist.com/beta/url/410474eb24ec757b5545d7c17eaec992c18b?card_name={cardname}&id={cardid}
So what it do is that whenever an automation triggers the Trello will replace the {cardname} with the actual value and assign this to the variable named “card_name” and post to the URL.
Complete List of Trello Variables
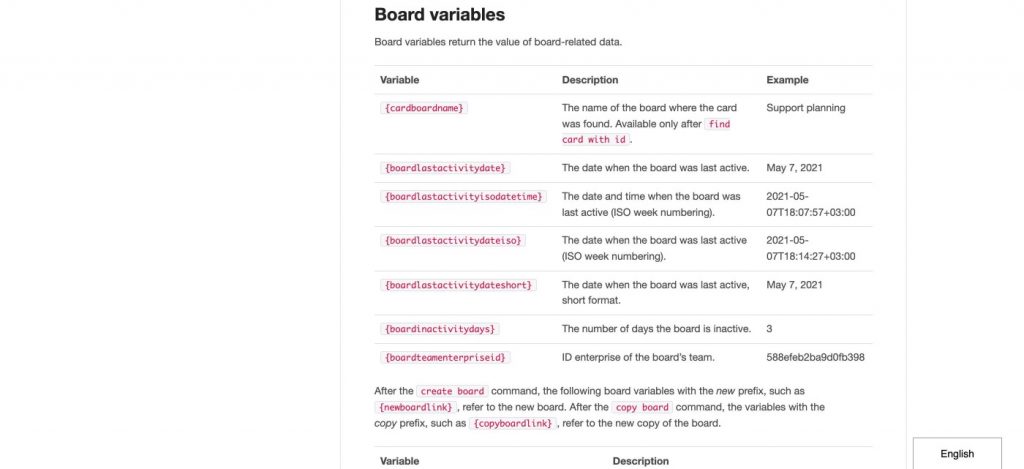
Kindly Note that in order to Send A WhatsApp Message the WhatsApp Number should be saved in your Card along with the Country Code. You can save this as a Card “Title” or in a “Custom Field” Please make sure that the field you save the WhatsApp Number don’t contains any other informations.
Creating Cards & Adding Comments in Trello when an Incoming WhatsApp Messages comes
This helps you to automatically create a card in the specific board & list you have configured along with the option to add the incoming message as comment in the specific card under “Activity”
We make use of the Picky Assist Connector “HTTP Request” action to push incoming messages from WhatsApp to Trello Board and this process includes 5 steps as explained below;
1. Generating Trello API Key & Token
The very first step is to generate the API token from your Trello account, make sure the the account you are using having access to the board also note that all comments will be added in the name of the user whom the API is generated, if you wish to track the comments and cards created by our platform then we recommend to create a new user and give a name like “WhatsApp Bot” then generate the API from that specific user
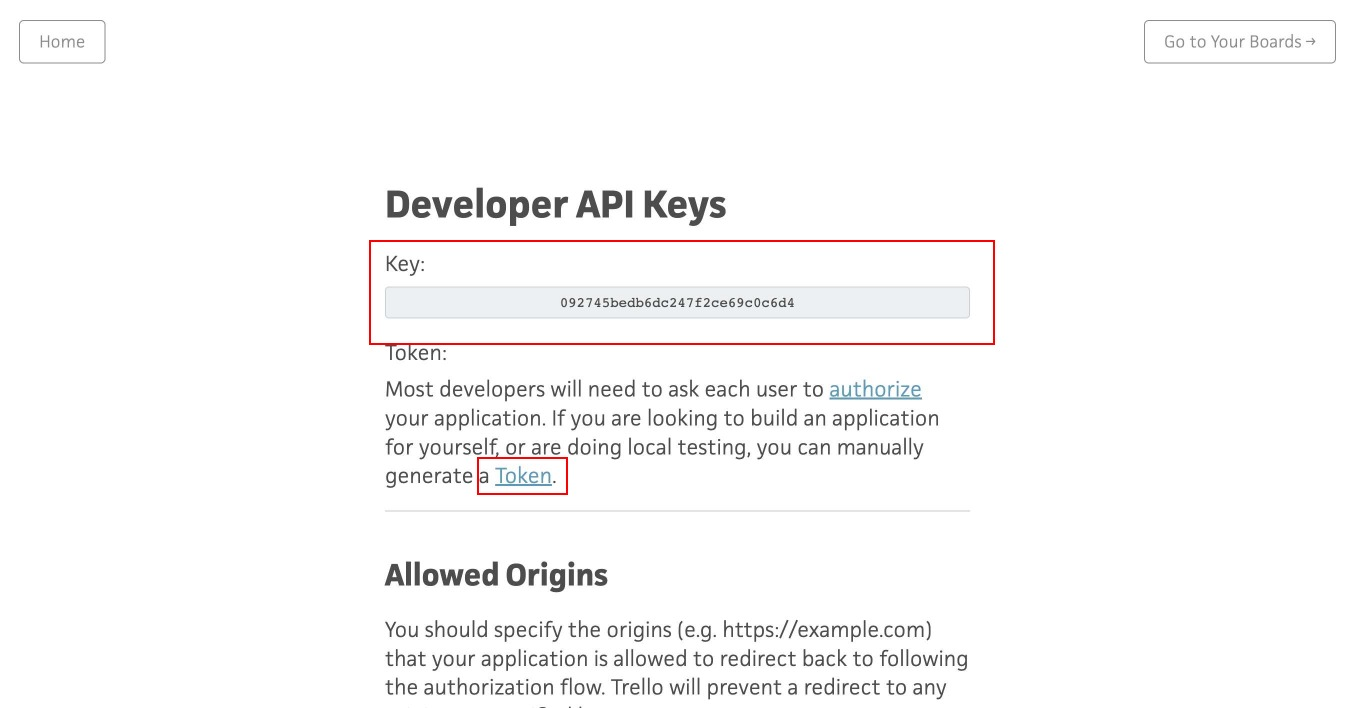
To Generate API Key make login into your trello account then click on this url https://trello.com/app-key in the browser and you will see a screen as shown below;
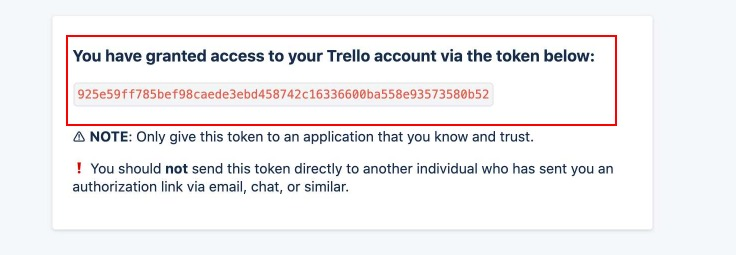
It will open a new window where you need to scroll down and click on “Allow” button as shown in the below image

You will then able to see a page which display the API Token of your Trello Account as shown in the below image;
Now we have got the API Key & API Token this needs to be saved somewhere as we need this in our next step with the Connector HTTP Trigger Action
2. Finding Trello Board ID & List ID
Now we need trello board id and list id of your trello account to which board we want to create a card and to which list we need to create it
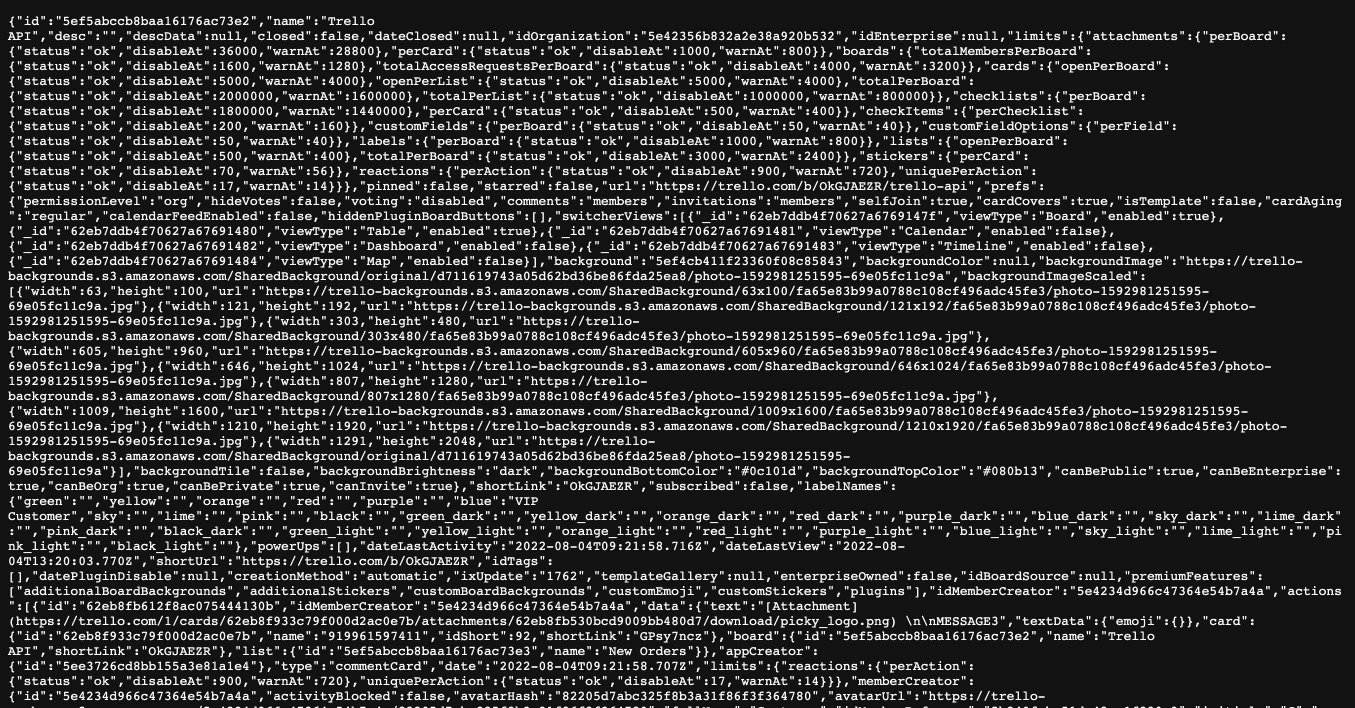
To find the Trello ID & Board ID please open the respective board in a browser then prefix .json at the end of the URL as hit enter
Example : If your trello board direct url is https://trello.com/b/OkGJAEZR/trello-api then make it as https://trello.com/b/OkGJAEZR/trello-api.json and hit the browser it will show you a JSON data as shown in the below image
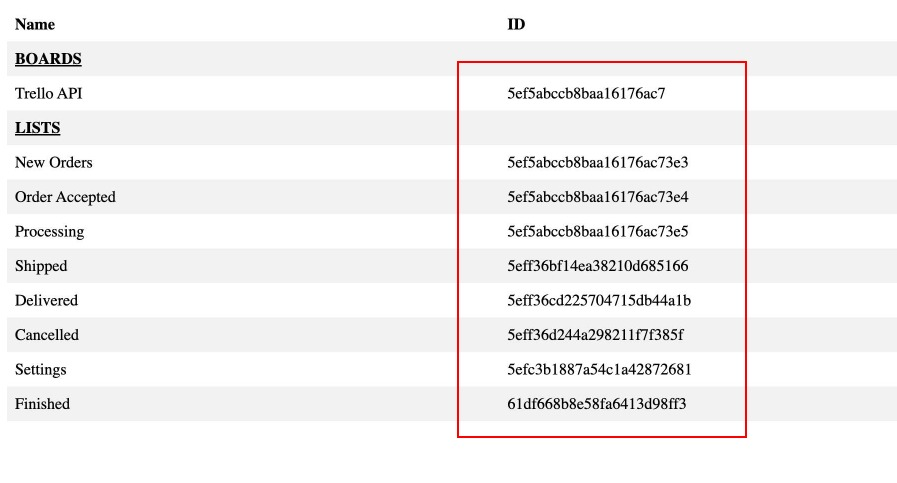
Now open this url in your browser https://pickyassist.com/app/api/trello/board.php and then copy and paste the code into the textbox and click on “Get Details” button as shown below and wait for few time which shows the Board ID & List ID present in your board
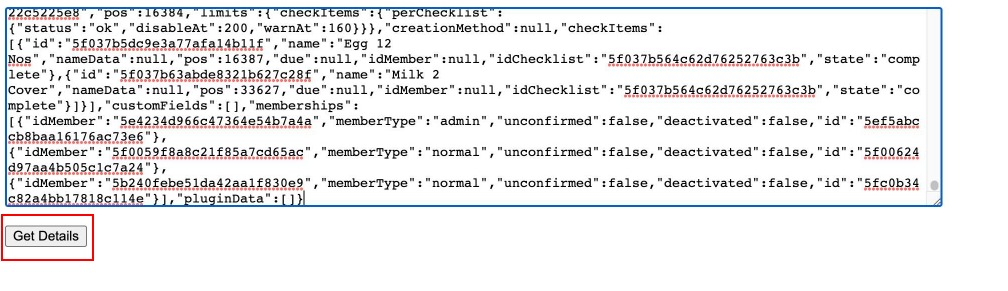
This will show you with all the unique ID of the Board & List you have in that specific board which we need it in the next step
3 Create A Connector
Now we create a new connector which needs to be used to push informations from Picky Assist to Trello Server whenever a new incoming WhatsApp message comes
4. Create Global Webhooks or Smart Reply
Now you need to make use of the Picky Assist Global Webhook or Smart Reply (Smart Actions – Route to Connector” feature to trigger the connector whenever an incoming messages comes to your WhatsApp
Send All Incoming Message to Trello
If you wish to send all incoming whatsapp messages to Trello then you need to make use of Global Webhook and configure the Connector “Connecting URL” as webhook
Send Conditional Message to Trello
If you wish to send only specific message to Trello like message contains “Help, Support, Call me” etc then you need to enable the Smart Replies and configure Smart Actions “Route to Connector” then select the newly created connector
5. Setting Up Connector HTTP Request
Now you need to setup HTTP Request in the Connector so that whenever the connector receives an incoming messages it triggers the HTTP request to Trello for creating a new card or adding a comment into the existing card
Go to the Connector then just send a message to your incoming message this helps you to map the incoming message with the Connector,
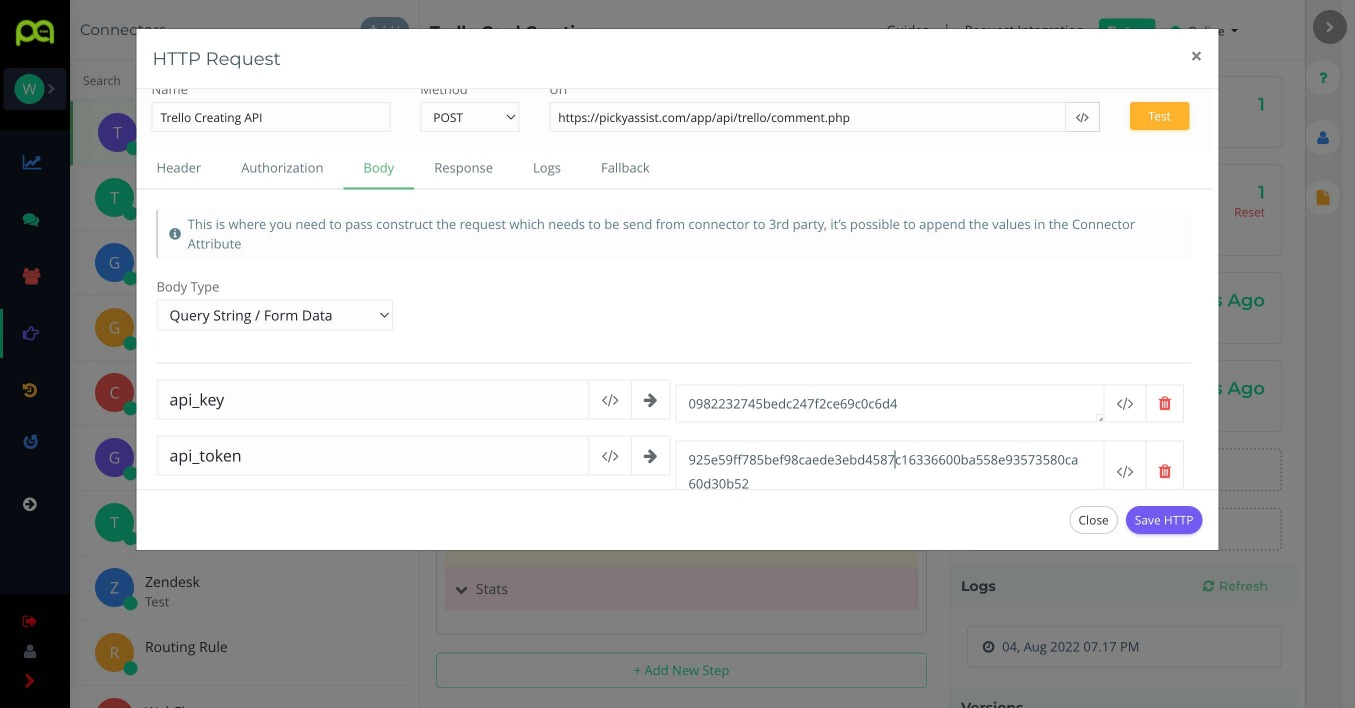
After that go to “Steps” and Create a New Step then select Action “HTTP Request” and fill in the below details with real value
Method : POST
URL : https://pickyassist.com/app/api/trello/comment.php
Variables
| api_key | API Key which we generated from the first step https://trello.com/app-key |
| api_token | API Token we generated in the second step |
| board_id | Board ID to which board you need to add the card, generated in the 3rd step |
| list_id | List unique id to which you want to add the card, generated in the 3rd step |
| number | WhatsApp number you need to map this dynamically |
| message | Incoming Message you need to make this dynamically |
| media | Media files if any for incoming, you need to map this dynamically |
Click on “Body” tab then select “Query String Form/Data” then key the variables in the left side and right side add the actual values which we have extracted from the above steps
Kindly Note that the Title (Name) of the Card should be the WhatsApp Number in order this to work perfectly, so don’t edit the Title of the Card, if you are creating cards manually then make sure you are inputting WhatsApp number along with country code.
The system automatically creates card with the Title as WhatsApp Number


Add comment