In this guide we will demonstrate how WhatsApp Integration into Integromat is possible using Picky Assist Solution.
Here we use 2 methods to send messages from Integromat as mentioned below ;
- Using Picky Assist JSON API
- Using Picky Assist Connector
WhatsApp Integration into Integromat Using Picky Assist JSON API
In this method we will make use of Picky Assist JSON API, you need to do some copy paste of codes to work this properly
If you have not generated an API key then you need to generate an API from your Picky Assist account Settings -> API -> Generate API Key . Read More on How to Generate API Key
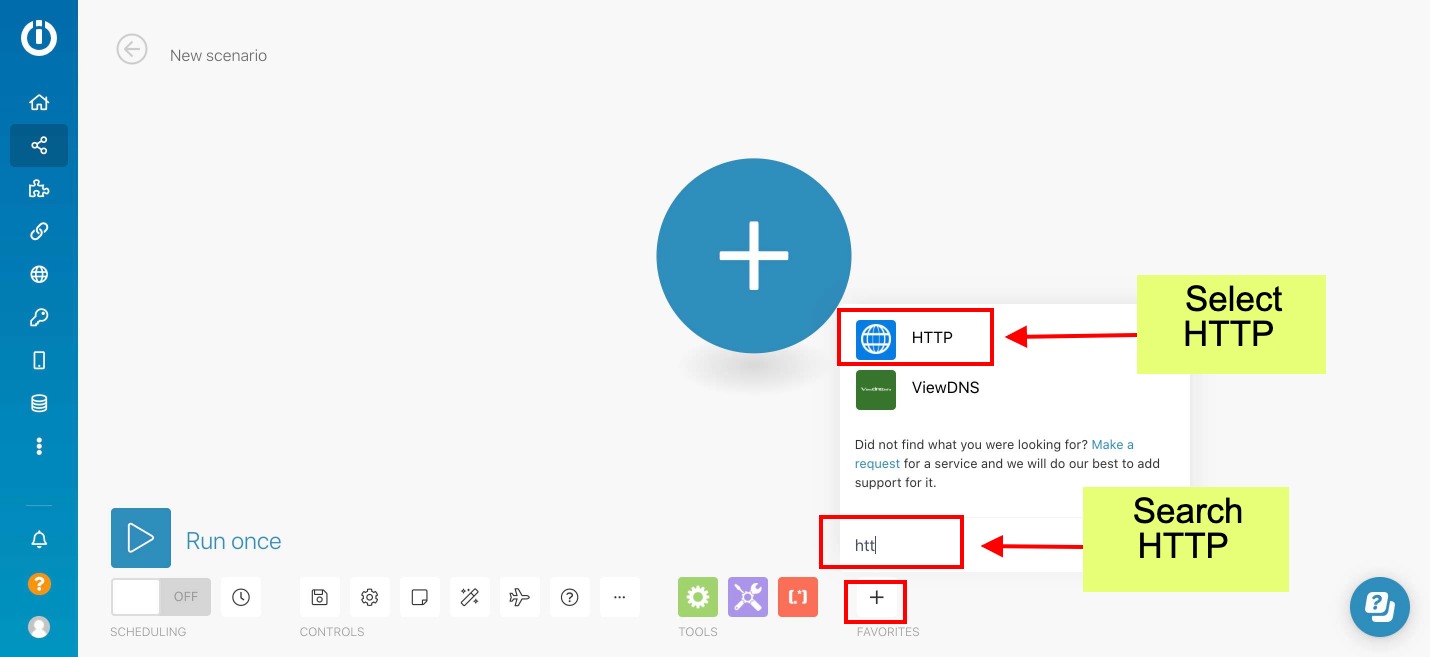
We make use of Integromat HTTP API Module to Trigger the Picky assist JSON API, so based on the situation you want to use Send a WhatsApp Message you need to add “HTTP API” module inside your Integromat Flow, see below images ;
1 – Search for HTTP Module and Select HTTP as shown below;
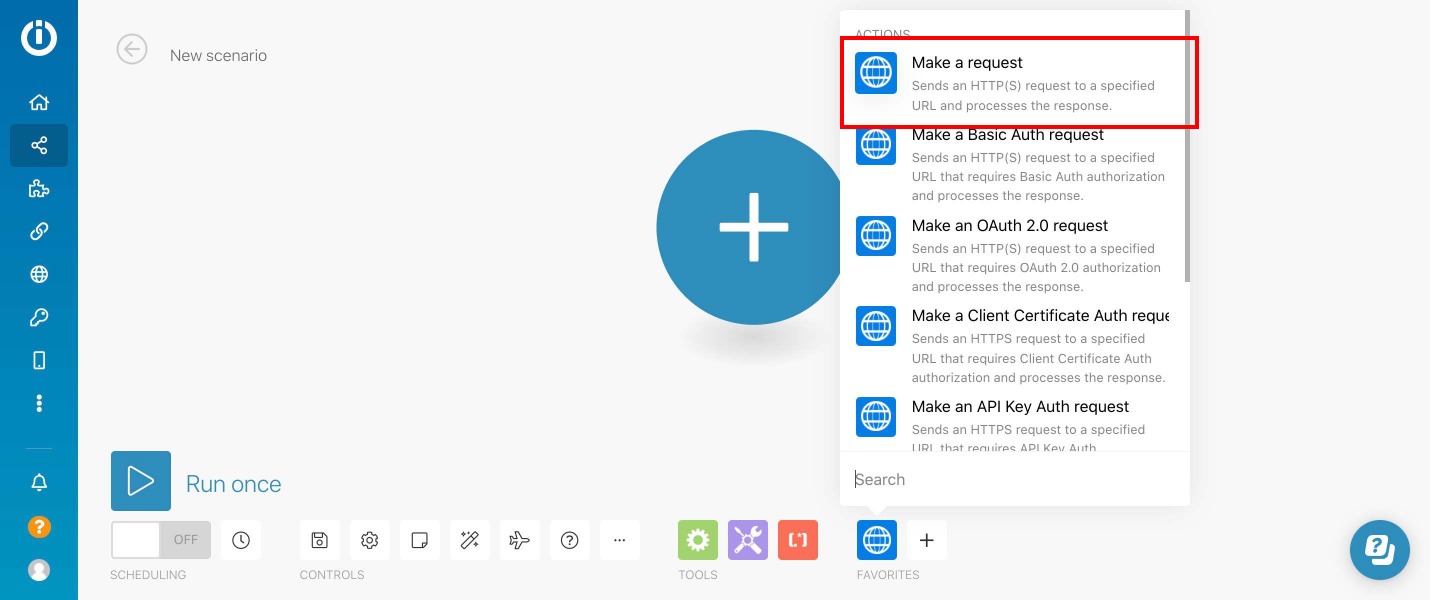
2 – Select “Make A Request” as shown below;
3 – Constructing the HTTP API Request
You need to copy and paste below URL in the “URL” https://pickyassist.com/app/api/v2/push
Select Method as “POST”
Then Select Body Type as “Raw”
Now, Select Content Type as “JSON (application/json)” as shown below

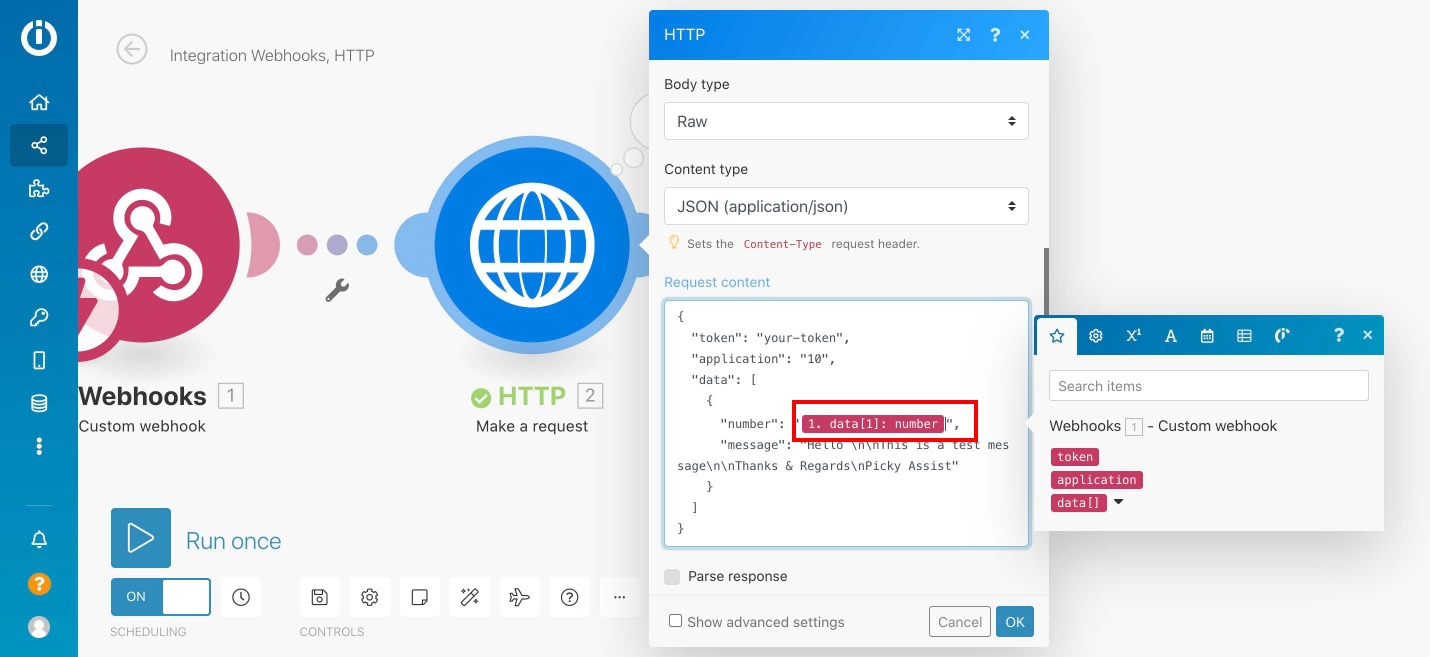
4 – Constructing the Request Body
In this step you need to copy the below code and paste, make sure you change followings
token = replace with your API Token of Picky Assist
application= 10 = WhatsApp Web Automation, 8 = WhatsApp Official – Complete Reference
number = put your whatsapp number followed by Country Code
message = put your message use \n\n for new line and ** for bold like *bold*
{
  "token": "put-your-token",
  "application": "10",
  "data": [
    {
      "number": "put-mobile-number",
      "message": "Hello \n\nThis is a test message\n\nThanks & Regards\nPicky Assist"
    }
  ]
}
You can dynamically pass mobile number or message from another module in your integromat flow as shown below
Now click on “OK” to save your HTTP Module and test the scenario and you should not get WhatsApp message every time the module get triggered in your integromat flow.
Sending Media Files
If you want to send media files then you need to pass the public url of the media file through the variable “globalmedia” Read More
Formating Messages
You can format the message with new line,, bold,italics etc . Read More
WhatsApp Integration into Integromat Using Picky Assist Connector
Sending WhatsApp message through Picky Assist Connector make use of the Picky Assist Connector URL & Integromat HTTP API Module
You need to Create a Picky Assist Connector in your Picky Assist account, the connector module is currently in beta so pleas access it through https://pickyassist.com/beta
Follow the Steps mentioned in this Guide to Create A Connector
Once you created a Connector in Picky Assist you will get a unique Connecting URL, you need to copy the same and paste this into the integromat HTTP Module as shown below;
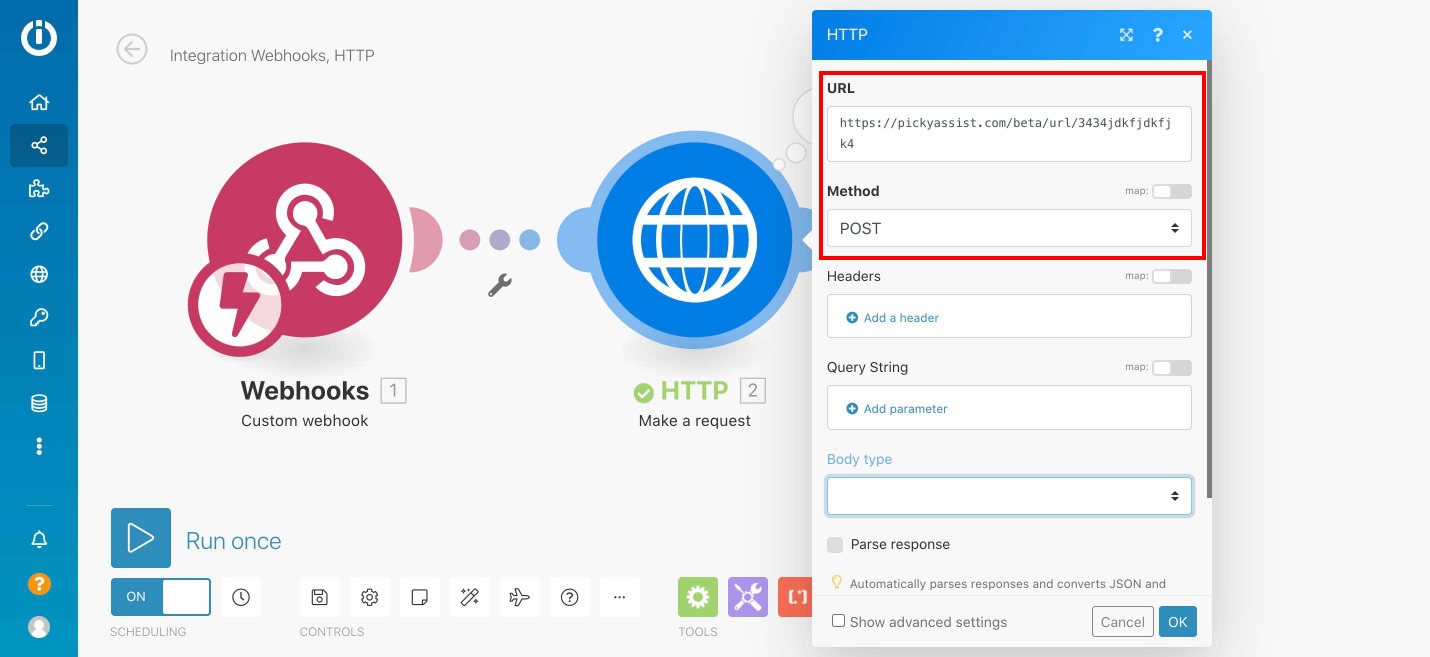
Step 1 – Constructing the HTTP API Request
You need to copy and paste Picky Assist Connector URL in the “URL”
Then Select Method as “POST”
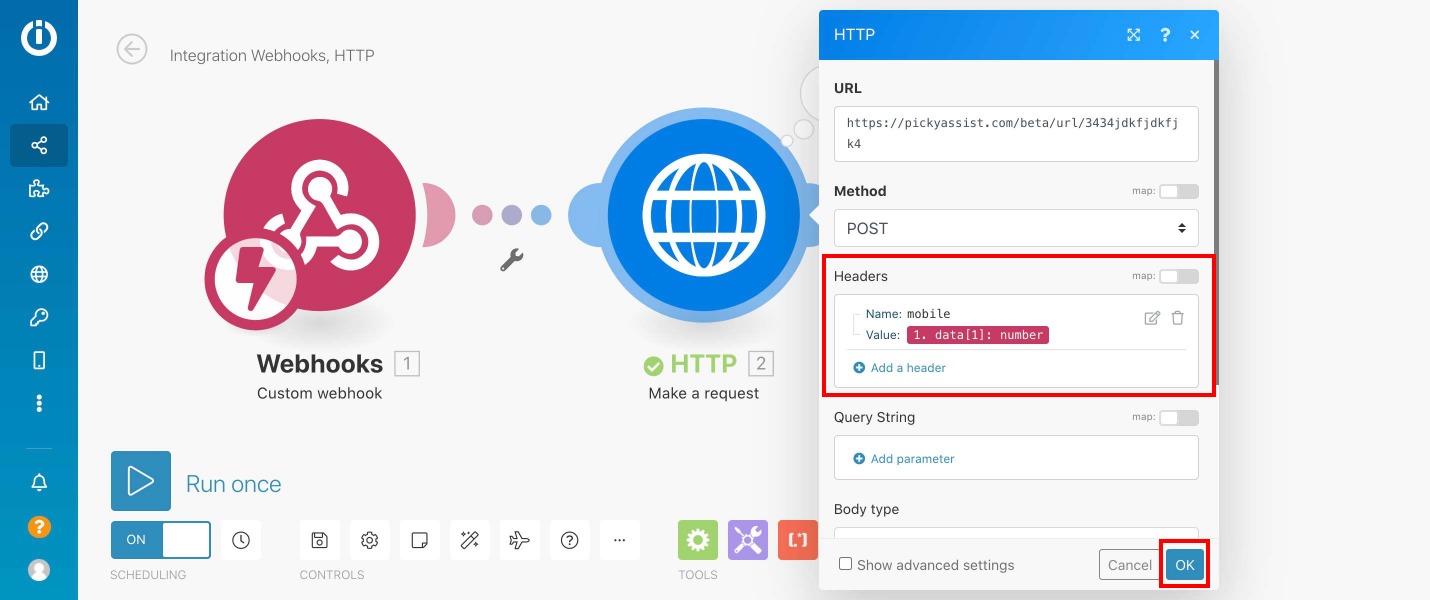
Step 2 – Constructing Query String Parameters
Now you need to make use of query string to pass data from other modules into Picky Assist Connector click on “Add Parameter” then from the Popup give a friendly name to identify like for passing mobile number give “mobile” then in the Value select the any another module value as shown below;
You can add as many as string parameters to pass more values, just repeat the above step to add more values into the query string.

Step 3 – Save the HTTP Request
Now you can click on “OK” to save the HTTP module
Step 4 – Sending a Test Request
Now you need to run your scenario once so that Integromat HTTP Module sends a sample request to Picky Assist Connector
Step 5 – Mapping the Response & Setting Actions in the Picky Assist Connector
After sending a test request from Integromat you need to open Picky Assist Connector then create an Action to “Send WhatsApp Message”
Learn How to Setup “Send Message” Action in Picky Assist Connector
Receiving Incoming WhatsApp Message into Integromat
To receive incoming WhatsApp message into Integromat we make use of Webhook module of both Picky Assist & Integromat
Step 1 – Setup Webhoook Module in Integromat
To create a Webhook in Integromat find the Webhook module by searching then click on “Custom Webhook” as shown below;

Click on “Add” then give any name to your webhook to identify easily as shown in the image

Step 2 – Setting Up Webhook in Picky Assist Platform
Now you need to copy the URL shown below and paste this into Picky Assist Webhook
Login into your Picky Assist account then navigate to Settings -> Webhook then under the “Webhook” paste the Webhook URL from the Integromat as shown below;
Copy from Integromat
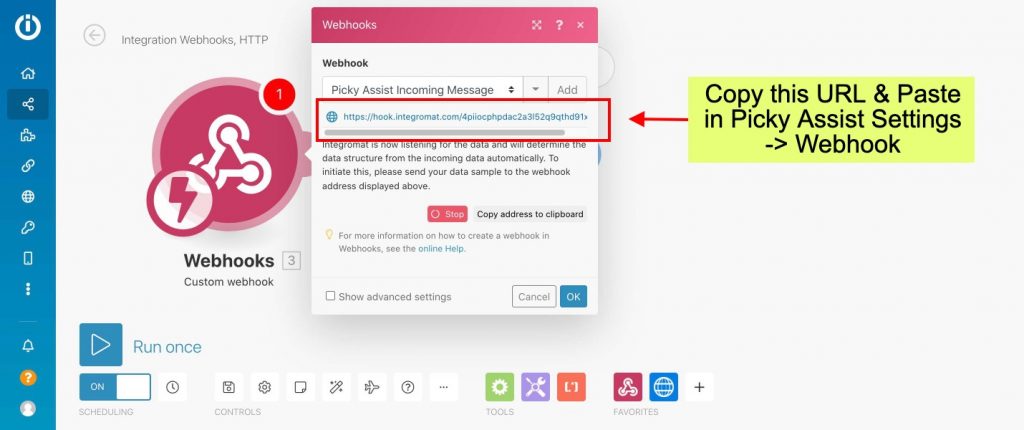
Paste into Picky Assist Settings -> Webhook as shown below;

Step 3 – Sending Test Data to Integromat Webhook
Now you need to send a test data into Integromat Webhook, for doing this simply send a message to your Connected WhatsApp from any other number or click on the “Test” button in the Webhook as shown below;

Now the Integromat Webhook gets updated with the Picky Assist Varilabes and these variables can be used further in any other modules in the flow.


Add comment