In this guide, we are going to learn how to Integrate Google Form & WhatsApp using Picky Assist Connector without Using Zapier or any other 3rd Party Automation Platforms.
Pre – Requisite
- WhatsApp Channel Activated In your Picky Assist Account
- A Picky Assist Plan which has access to Connector Module
- Google Form (You should be the owner of the Google Form)
Usecases
Google forms are widely used to collect data from users which can be used for a variety of use cases, few are mentioned below;
- Call Back
- Contact
- Product Request
- Feedback
- Interview Form
- E-Commerce Orders
- Surveys
Once you connected Google Form & Picky Assist Connecter you will able to perform a wide range of actions whenever a Google Form is Submitted, few usecases are listed below;
- Send A Thankyou WhatsApp message to the User who fills the form
- Inform your Sales Team via WhatsApp / Email about new form submission
- Create an Advanced Filter and Send WhatsApp Message based on the Filter Condition.
- Add the Google Form entries as PIcky Assist Contact
- Add Tags & Categories for user segmentation and later using the Broadcaster feature.
- Add User into a Sequence (WhatsApp Drip Campaign)
- Assign a Chat to a Team Member / Department using Teambox
Watch Step by Step Video Setup
Getting Started
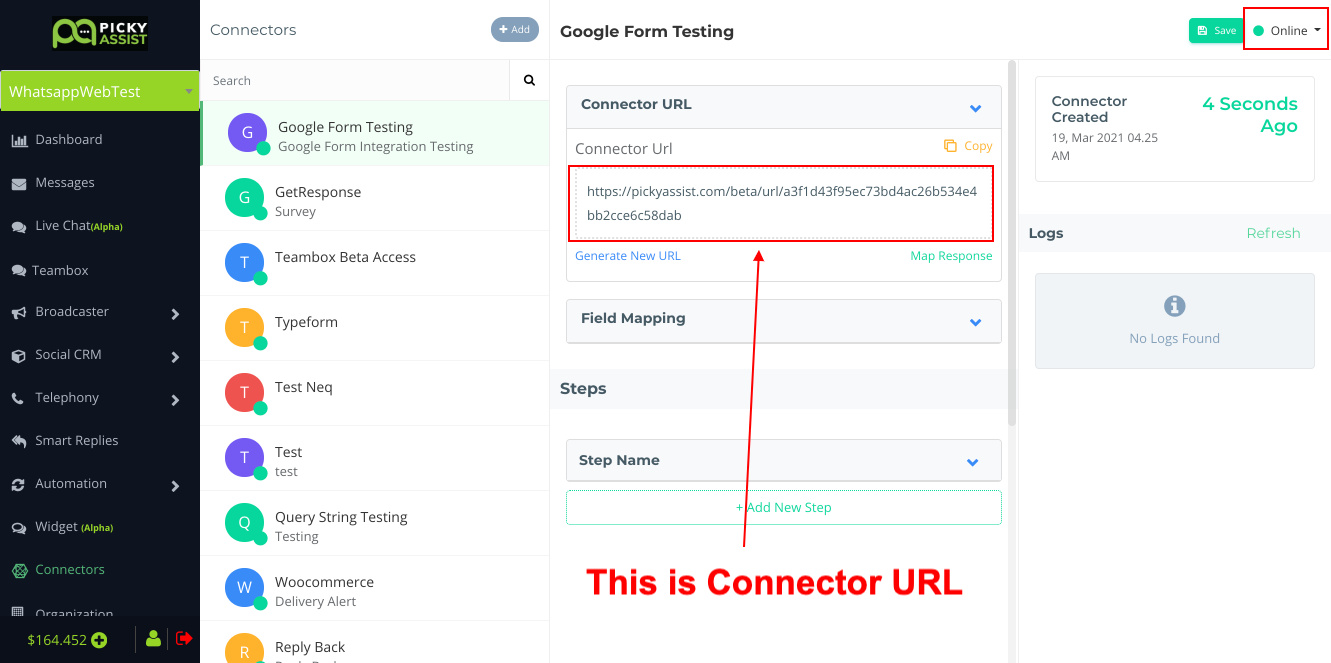
The first step is to go to Picky Assist and create a Connector URL, just make sure the Connector is in Online Mode to start accepting requests from Google Server whenever a new form submits.
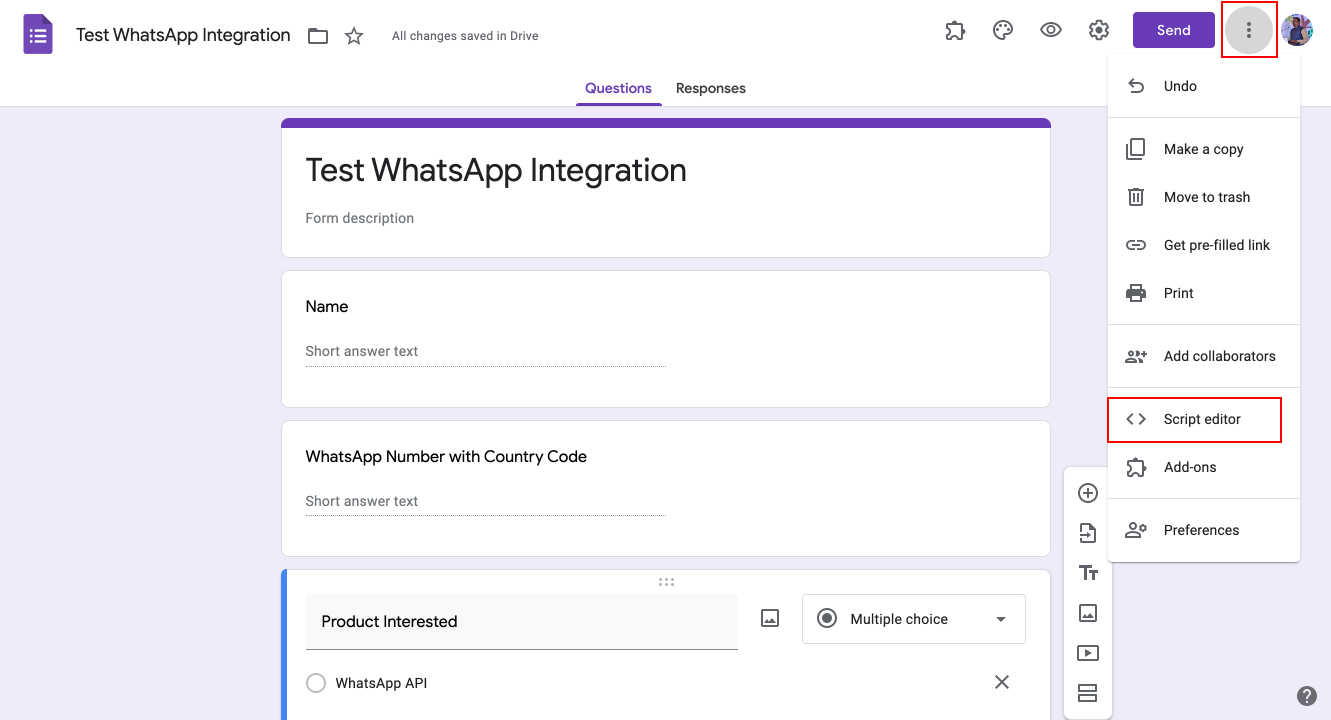
Open Google Form
Then navigate to the Right Side 3 dotted menu and select the “Script Editor” and you will see something like as shown below;
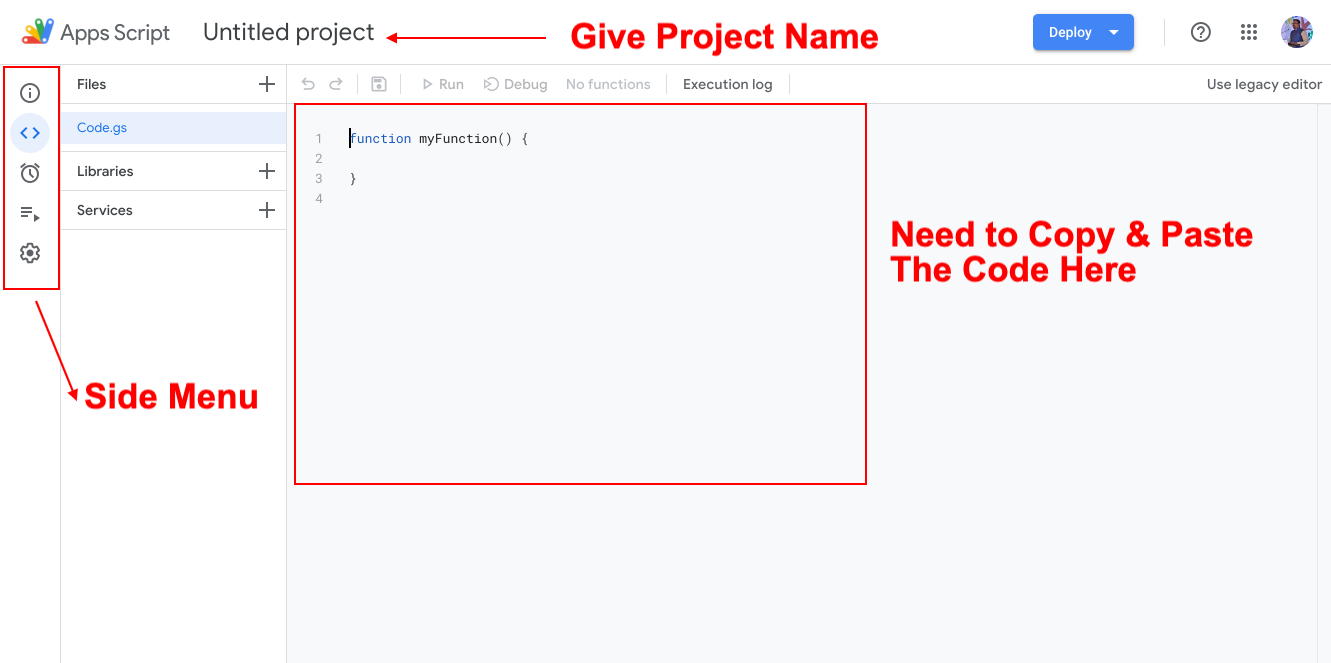
In the Code.js file just copy the below code and paste it
var POST_URL = "https://pickyassist.com/beta/url/a3f1d43f95ecd4ac26b534e4bb2cce6c58dab";
function onSubmit(e) {
    var form = FormApp.getActiveForm();
    var allResponses = form.getResponses();
    var latestResponse = allResponses[allResponses.length - 1];
    var response = latestResponse.getItemResponses();
    var payload = {};
    for (var i = 0; i < response.length; i++) {
        var question = response[i].getItem().getTitle();
        var answer = response[i].getResponse();
        payload[question] = answer;
    }

    var options = {
        "method": "post",
        "contentType": "application/json",
        "payload": JSON.stringify(payload)
    };
UrlFetchApp.fetch(POST_URL, options);
};
Now we need to update the 1st line code, your need to replace the connector url with your own here as shown below;

Make sure you have pasted the Connector URL correctly inside the double quotes
Now Click on “Save” Icon to Save the Project, you can give any relevant name to the Project to identify it later
Setup Trigger in Google Form
The next step is to Configure the Trigger in the Google Form so that every time google triggers the code when a new form is submitted, select the trigger menu from the left side menu bar as shown below;

Then Click on “Add Trigger” then configure it as seen in the below screenshot

After that click on the “Save” button and that’s it, please make sure you have selected the settings exactly the same as shown in the above image.
Testing the Integration
Now open the Google form and fill in the data then submit the form.
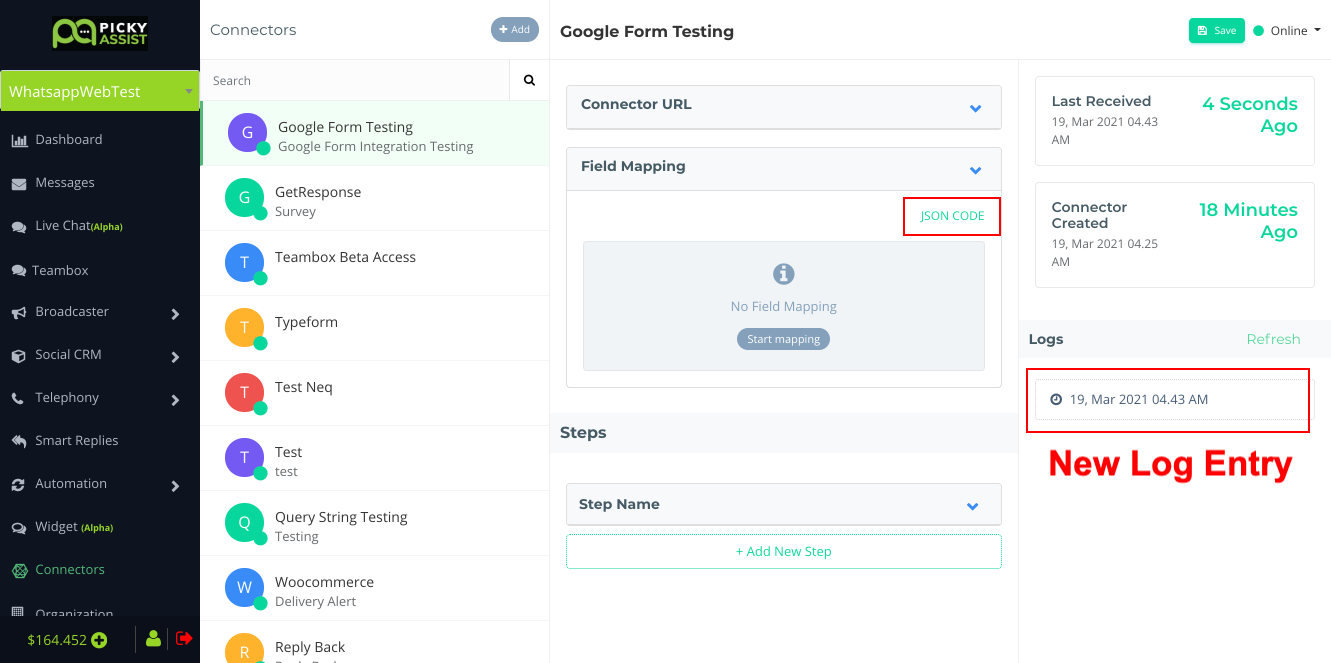
Go to your Picky Assist Account then navigate to Connector, select the connector which was created for this Google Form then in the left sidebar you will able to see logs, this means the Google notified the Picky Assist for the new form submission as shown below;
Let’s Map the Form with Picky Assist
Now it’s time to map the Google form structure with Picky Assist so that it can perform various conditions and actions as per your business requirements.
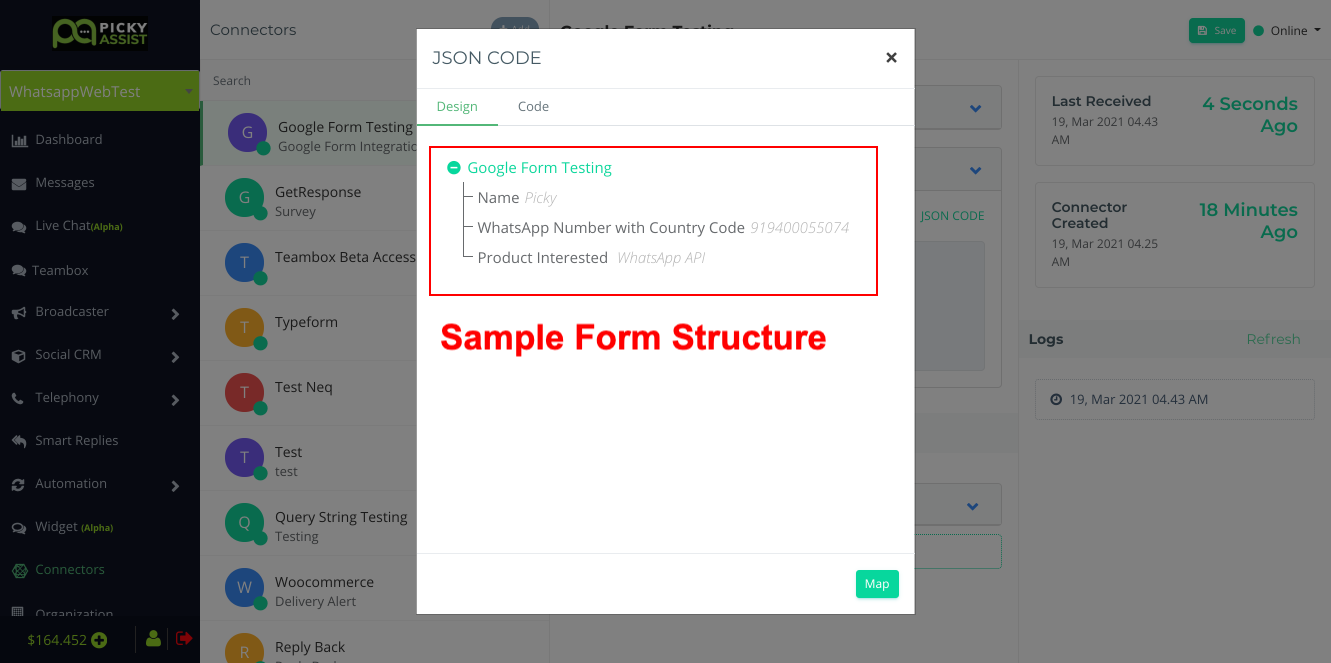
Go to Field Mapping
Click on JSON Code and from the popup click on Map after that, you will able to see the form question and answer sample in the Picky Assist as shown below;
Adding as Contact / Contact Subscriber
If you wish to add the Google form details as a contact in the Picky Assist then you need to start mapping the fields, please note this step is required only if you need to save the contacts into Picky Assist Account
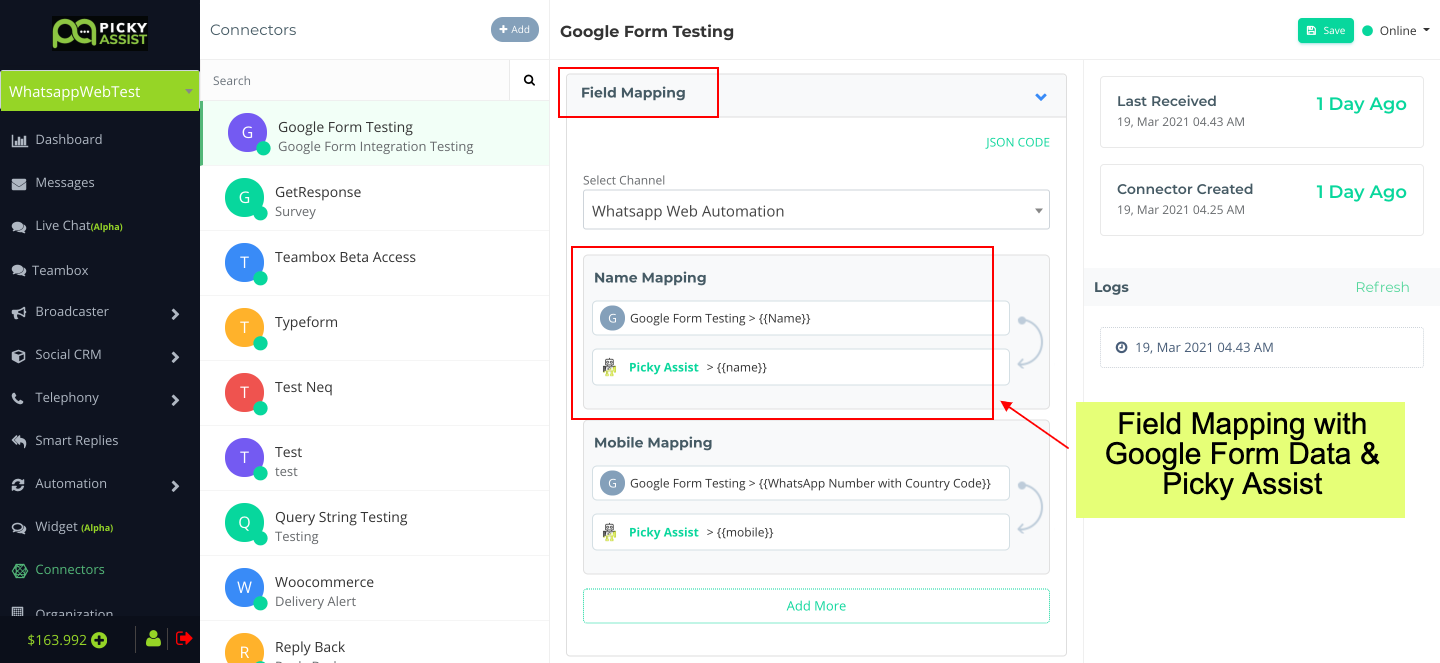
Please note Mobile number with a country code is mandatory for sending WhatsApp messages from the Picky Assist Platform, so always ensure you are collecting the WhatsApp Number along with Country Code.
Sending WhatsApp Message
To send a WhatsApp Message you need to create a Step and inside the Step Create an Action “Send Message” after that you can draft the message as shown below;
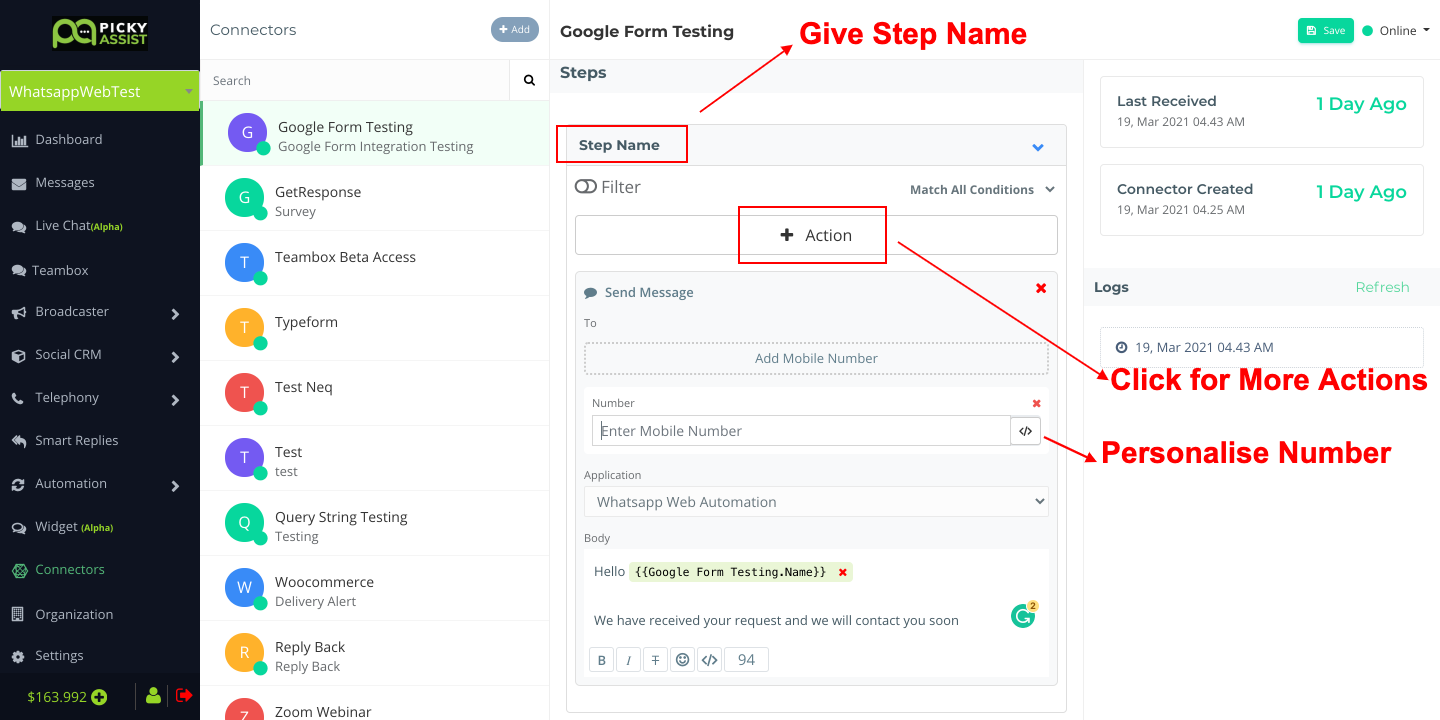
You can personalize the message using the Google Form fields or Picky Assist Subscriber fields using the Attributes.
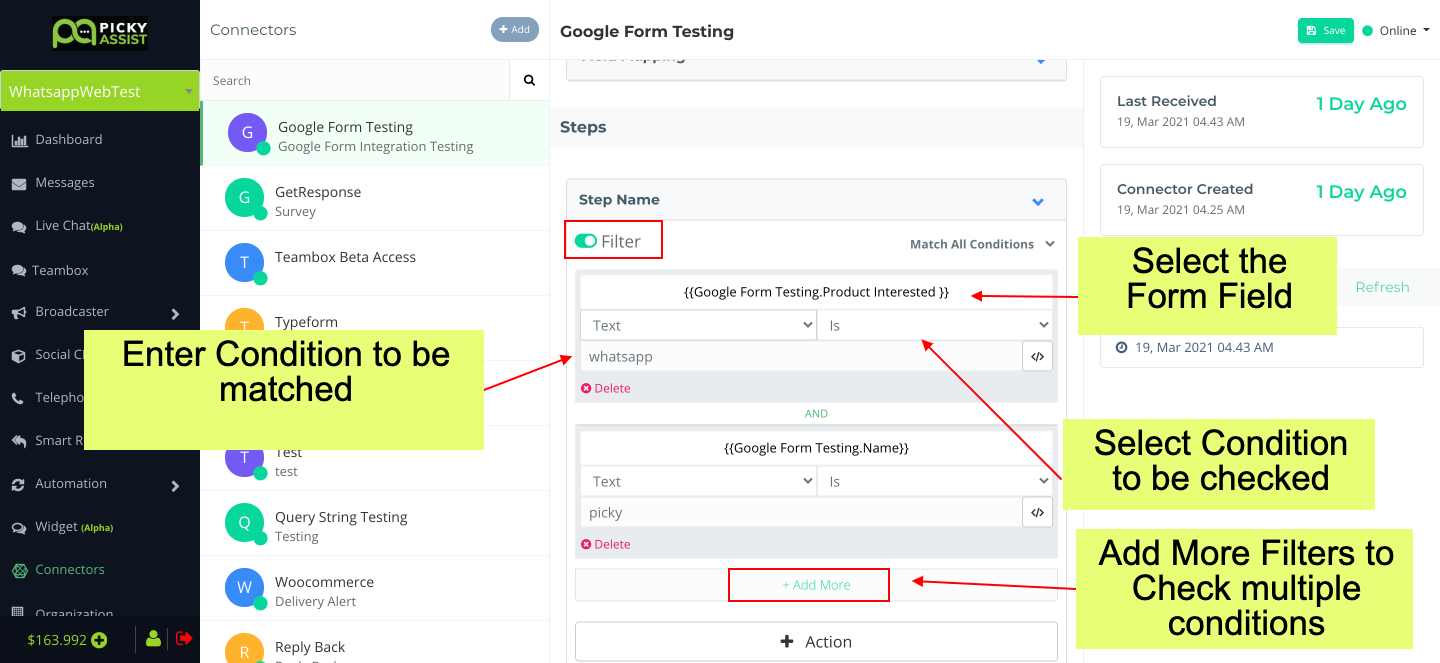
Creating Filters
Filters are useful if you wish to check certain conditions in the form and then perform the actions based on the condition for example if you offer 3 services and when the user selects Service 1 you want to alert a sales rep who handles the Service 1 and move the user into the specific category.
Advanced Features
Using the Connector Multi Step, Filter & Actions features you can achieve more advanced features as listed below ;
- Sending different messages to different Mobile Numbers, like alerting your sales team about new form submission, sending a thankyou message to the user who filled the form.
- Adding User into a Sequence (WhatsApp Drip Campaign) to send a series of messages which are related to the customer enquiry, using the filters it’s possible to enroll users into specific drip campaigns automatically based on the Google form value.
- Segmenting users automatically into Category & Tags that help to identify the user later or send personalized mass messages using Broadcaster
- Assign to an agent for instant engagements through WhatsApp using Teambox, using the filter it’s possible to assign a chat to the right department or agent as per the user form values.
Important Notes
- After the initial setup if you are editing the form then please make sure that you update the latest Form Structure in the JSON Code under field mapping To do this after making the changes in the form, fill and submit a sample entry then go to the Picky Assist and from the right side logs click on the last log received time and from the popup copy the Request Body Code and paste into the JSON Code section then click on Map to update the Structure.
- Always make sure you are adjusting the filter conditions and attribute values if the form field names are getting an update.
- If your form allows users to upload files then the uploaded file will not be available with Picky Assist due to Google Drive restrictions, the uploaded file will be visible only to the form owner.
- Always ask users to fill in the mobile number along with the country code to avoid failed messages.


Add comment