This article demonstrates how to integrate Google Sheets and WhatsApp using the Picky Assist Connector without third-party automation platforms. Integrate Google Sheets and WhatsApp to automatically send messages, manage contacts, and trigger workflows directly from spreadsheet updates.
Pre – Requisite to integrate Google Sheets and WhatsApp
- WhatsApp Channel Activated In your Picky Assist Account
- A Picky Assist Plan which has access to Connector Feature
- Google Sheet (You should be the owner of the Sheet)
Google Sheet
In this guide let’s discuss how to send WhatsApp messages directly from Google Sheets using Picky Assist Connector.
What You Can Do?
You can trigger Picky Assist actions whenever a specified Google Sheets column is edited or a new row is added. See this example!
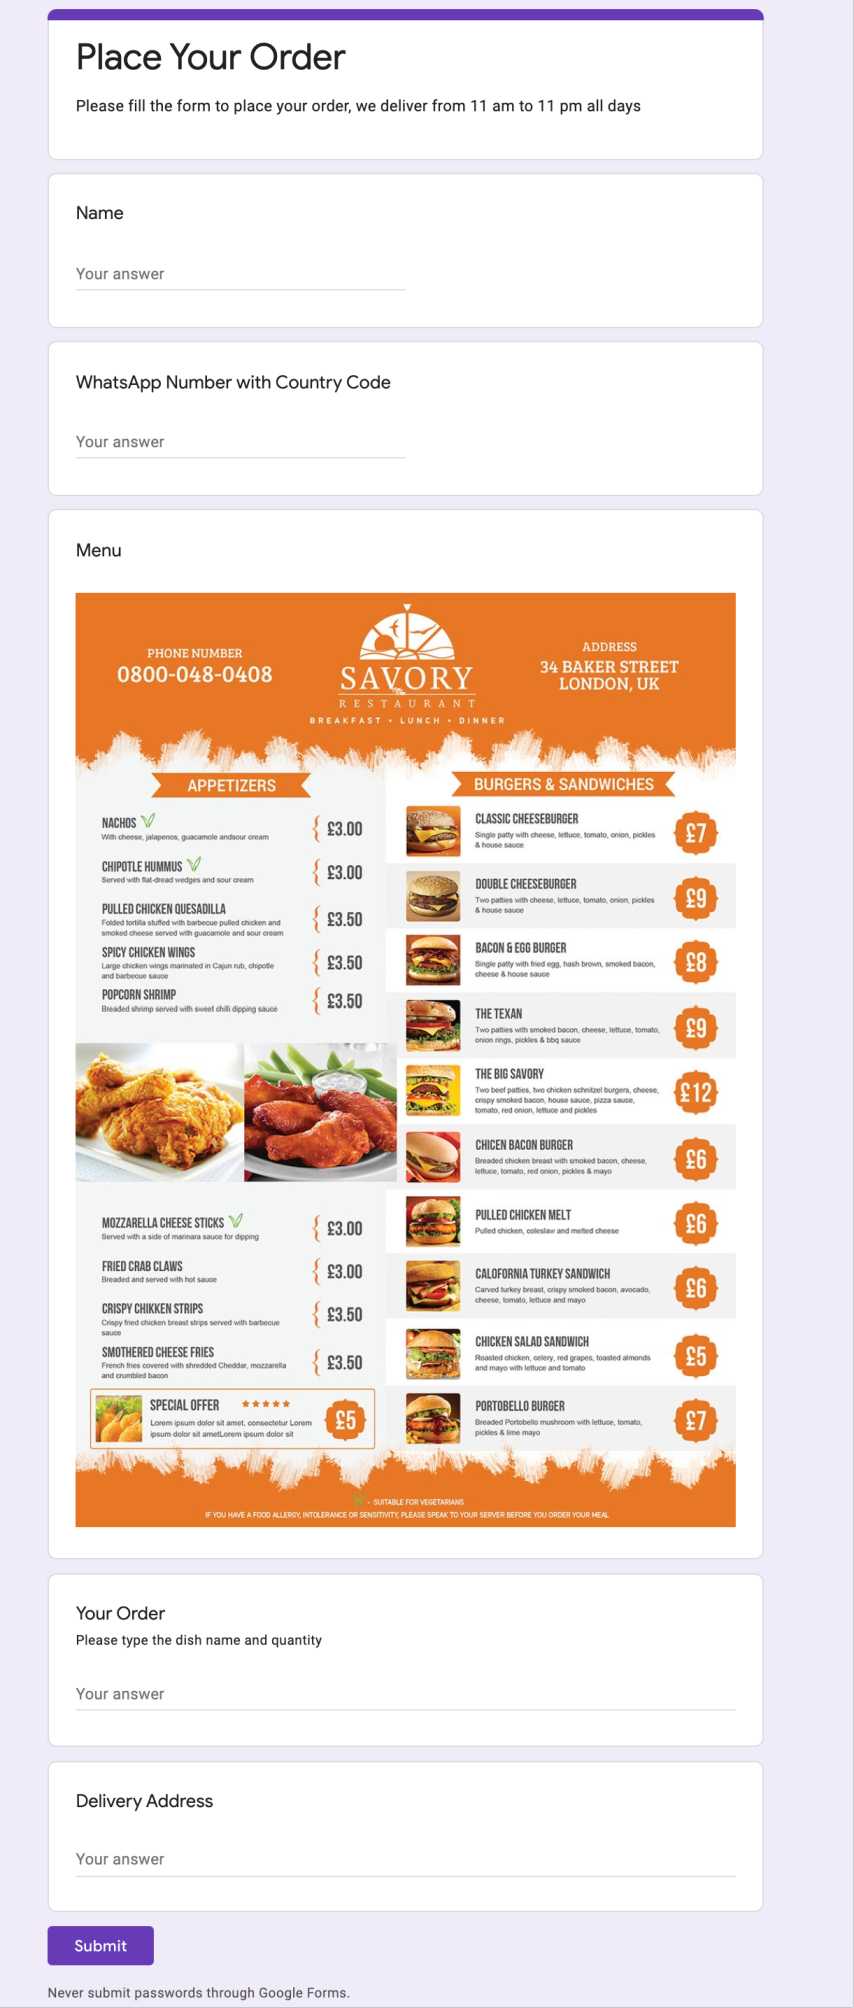
A Small Restaurant accept orders through a Simple Google Form and use the Google Sheet to manage the order. The Google Sheet is shared with the employees for easy collaboration.
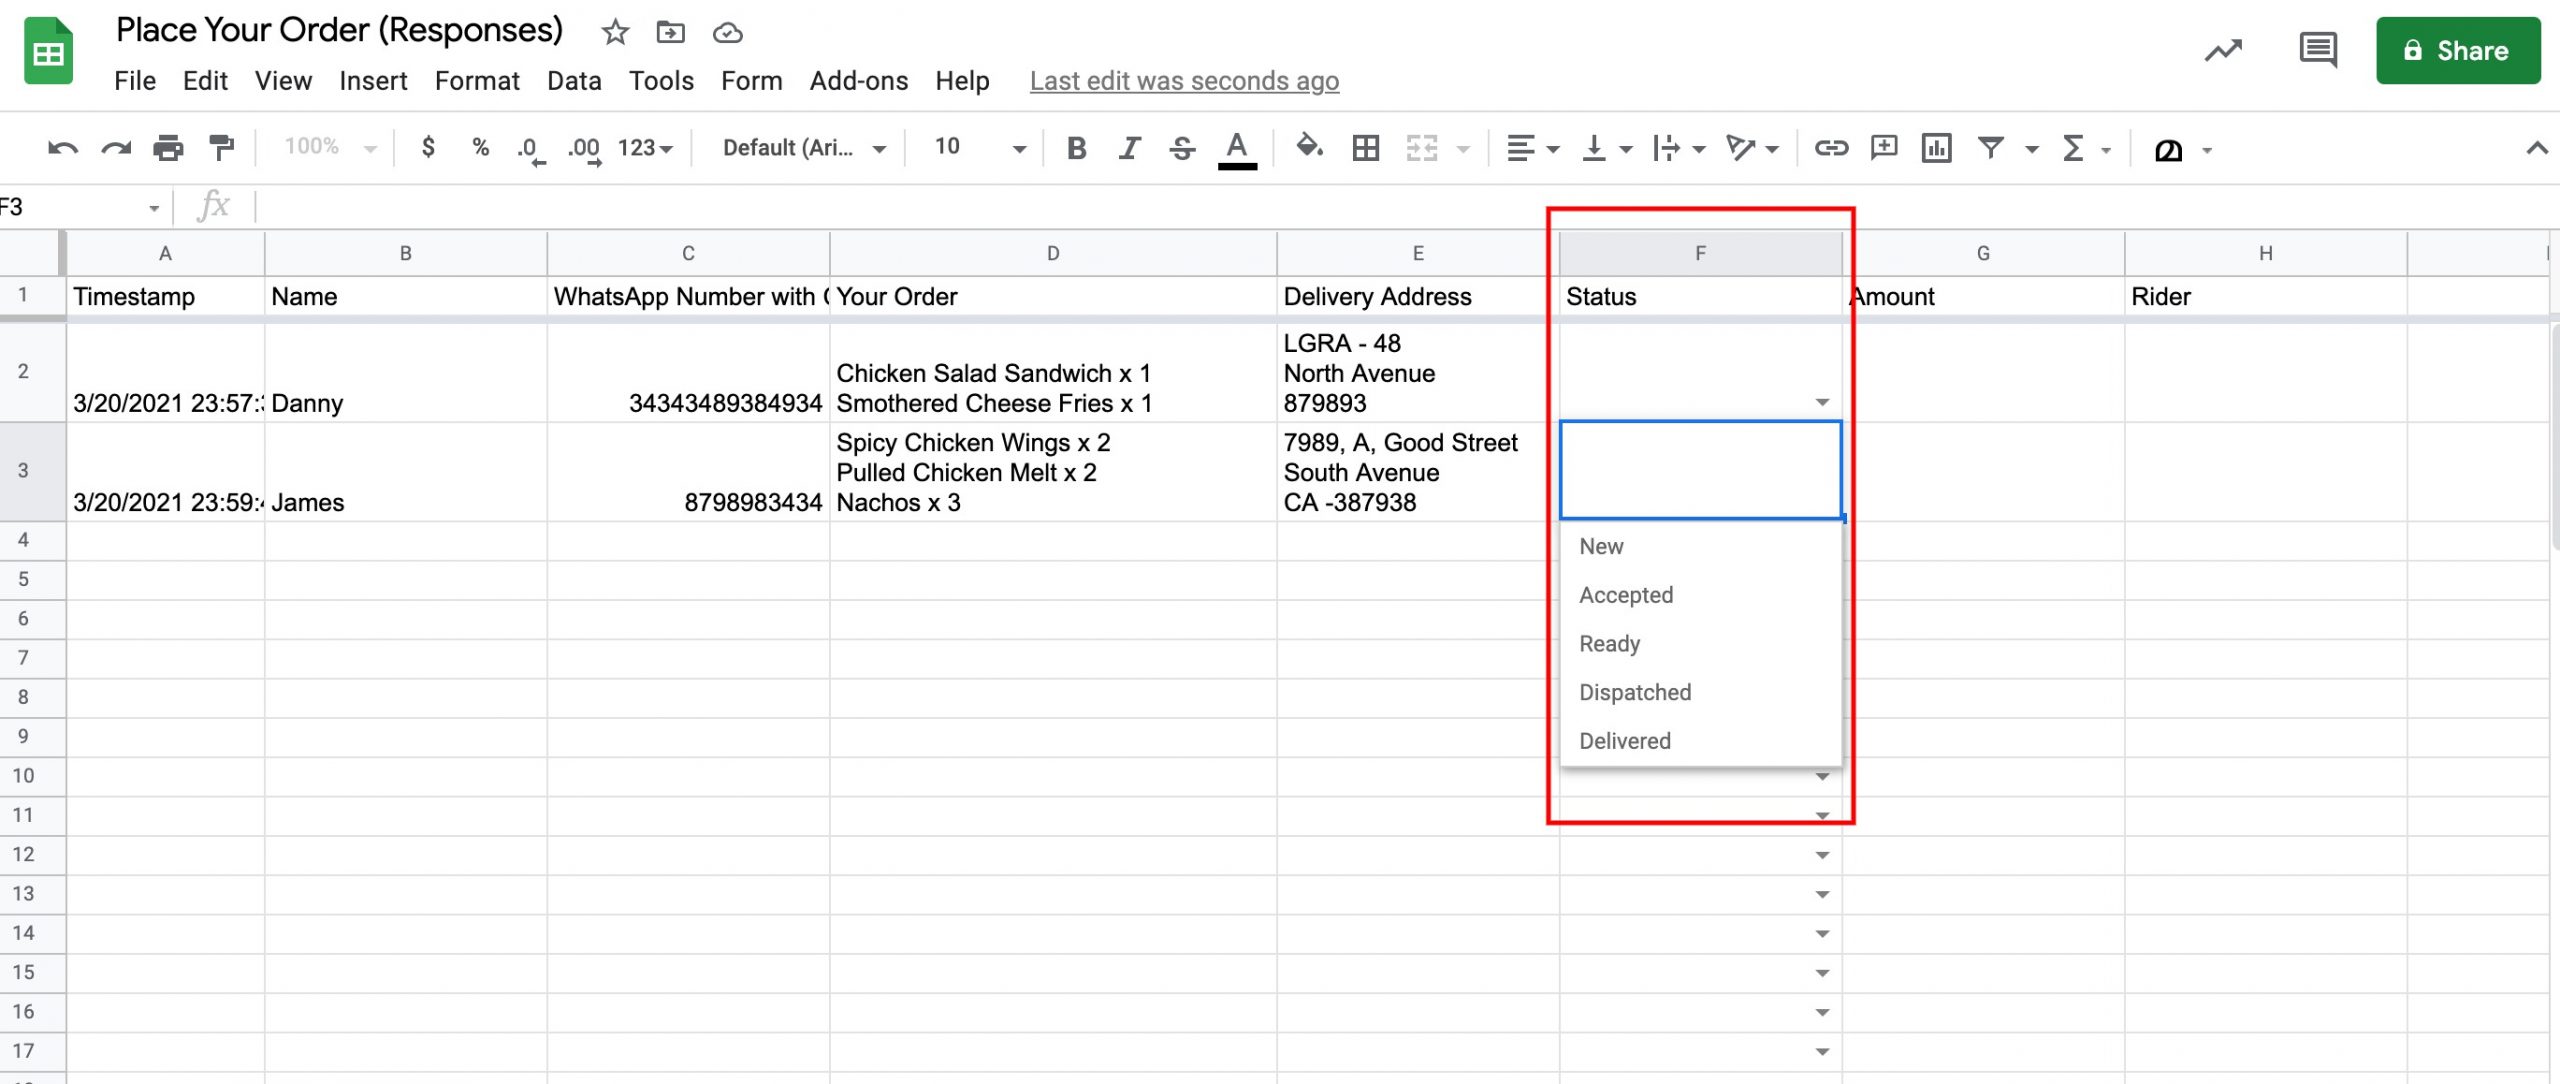
Now the Restaurant want to do the following actions whenever their employees make changes to the Google Sheet. It is always specified Column Status as shown in the below image:
- Order Accepted -> Send A WhatsApp Message to the Rider & Customer
- Order is Ready -> Send A WhatsApp Message to the Customer and Inform the Rider
- Order Dispatched -> Send A WhatsApp Message to the Customer
- Order Delivered -> Send A WhatsApp Message to the Customer
How it Works?
Now let’s consider the above usecase and the order status is saved in Column F as shown below;
Now we want to perform an action of sending a message whenever Column F is edited. So, whenever Column F is edited Google Sheet will send a request to the Picky Assist. This is along with complete data in the specific row which got edited.
Then using the connector you will able to map these row data and create different steps to send different messages. So in this case we need to send 5 messages based on the order update status in Column F. So in order to do this we have to create 5 steps in the connector along with the Filter & Actions.
Getting Started
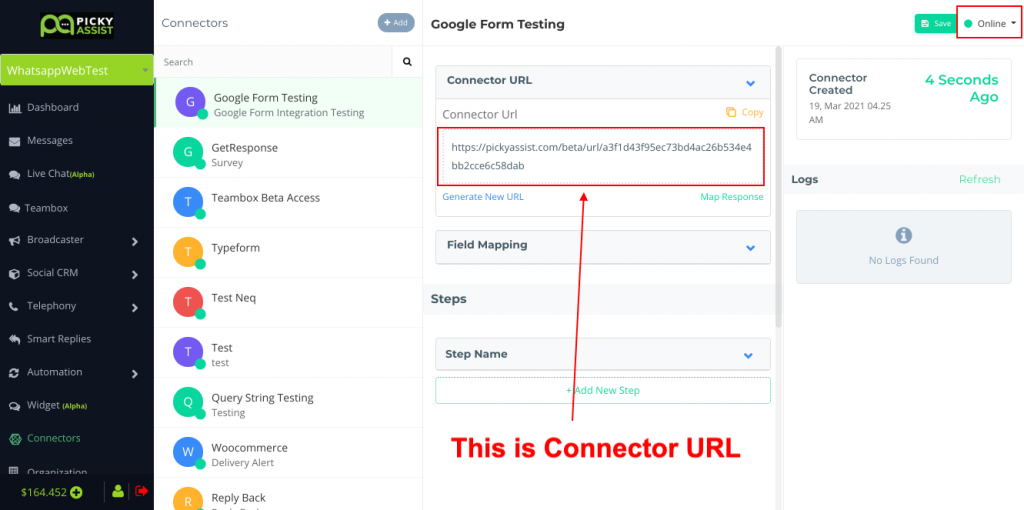
The first step is to go to Picky Assist and create a Connector URL. Make sure the Connector is in Online Mode to start accepting requests from Google Sheet whenever the specified column is edited.
Open Google Sheet
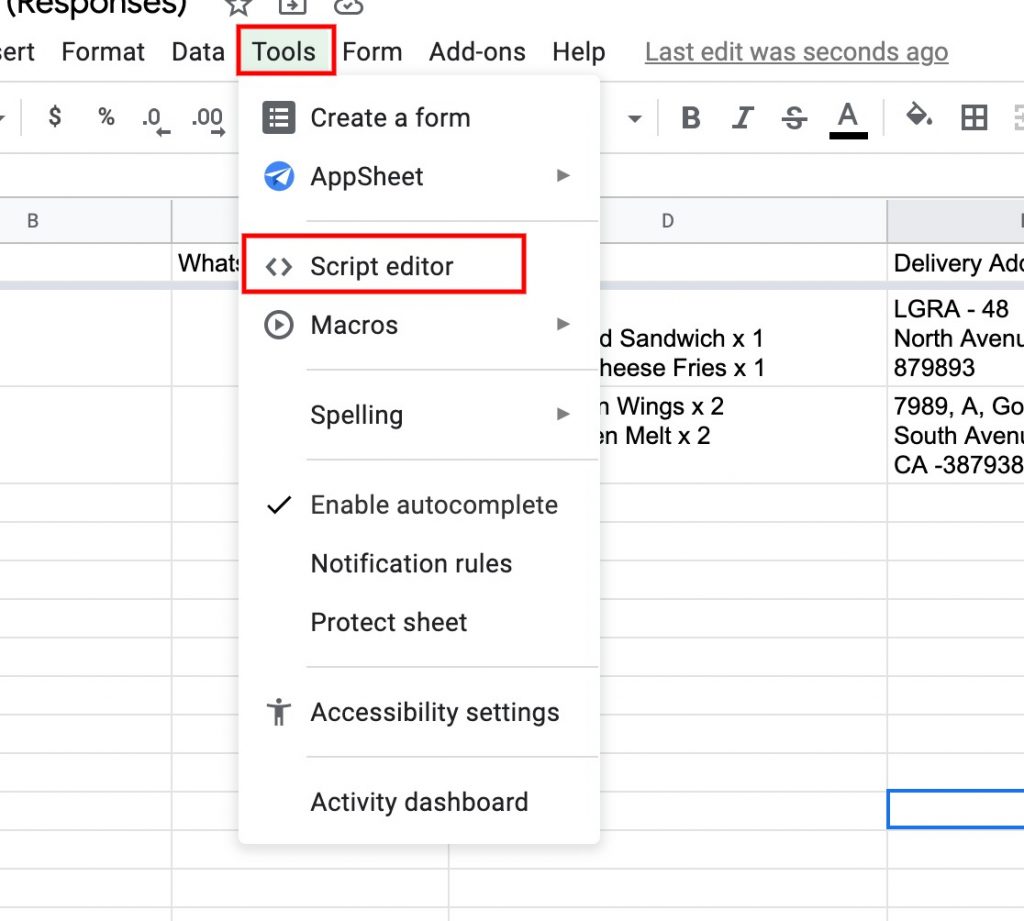
Then navigate to the Tools -> Script Editor
In the Code.js file just copy the below code and paste it
var TargetColumn = 'F';
function columnToLetter(column) {
  var temp, letter = '';
  while (column > 0) {
    temp = (column - 1) % 26;
    letter = String.fromCharCode(temp + 65) + letter;
    column = (column - temp - 1) / 26;
  }
  return letter;
}
function onEdit(e){

  var range = e.range;

  var StartRow  = range.getLastRow() - range.getNumRows() + 1;
  var LastRow = range.getLastRow();

  if( columnToLetter(range.getLastColumn()) != TargetColumn)
    return false;
var ss = SpreadsheetApp.getActiveSpreadsheet();
var sheet = ss.getSheetByName(range.getSheet().getName());


for ( var crow = StartRow; crow<= LastRow; crow++){

  var formData = {
      'CELL_UPDATED': range.getA1Notation(),
      'NEW_VALUE': range.getValue(),
      'SHEET':range.getSheet().getName(),
  };

  var range1 = sheet.getRange(crow, 1, 1, sheet.getLastColumn());
  var values = range1.getDisplayValues(); //getValues();

  for (var i = 0; i < sheet.getLastColumn(); i++){
    formData[columnToLetter(i+1)] = values[0][i];

  }

  var options = {
      'method' : 'post',
      'payload' : formData
    };

  UrlFetchApp.fetch('https://pickyassist.com/beta/url/470b5a2689e86f575f9bbcf4060f6b3c7913035', options);
  delete formData;
}
}
Now we need to update the 1st line code & 45th line of the code as explained below
In our example we want to send different messages whenever the value in Column F gets edited, so specify as “F” exactly as shown in the image below;

Now we need to update the Connector URL. Just go to line number 45 and paste the Connector URL as shown below;
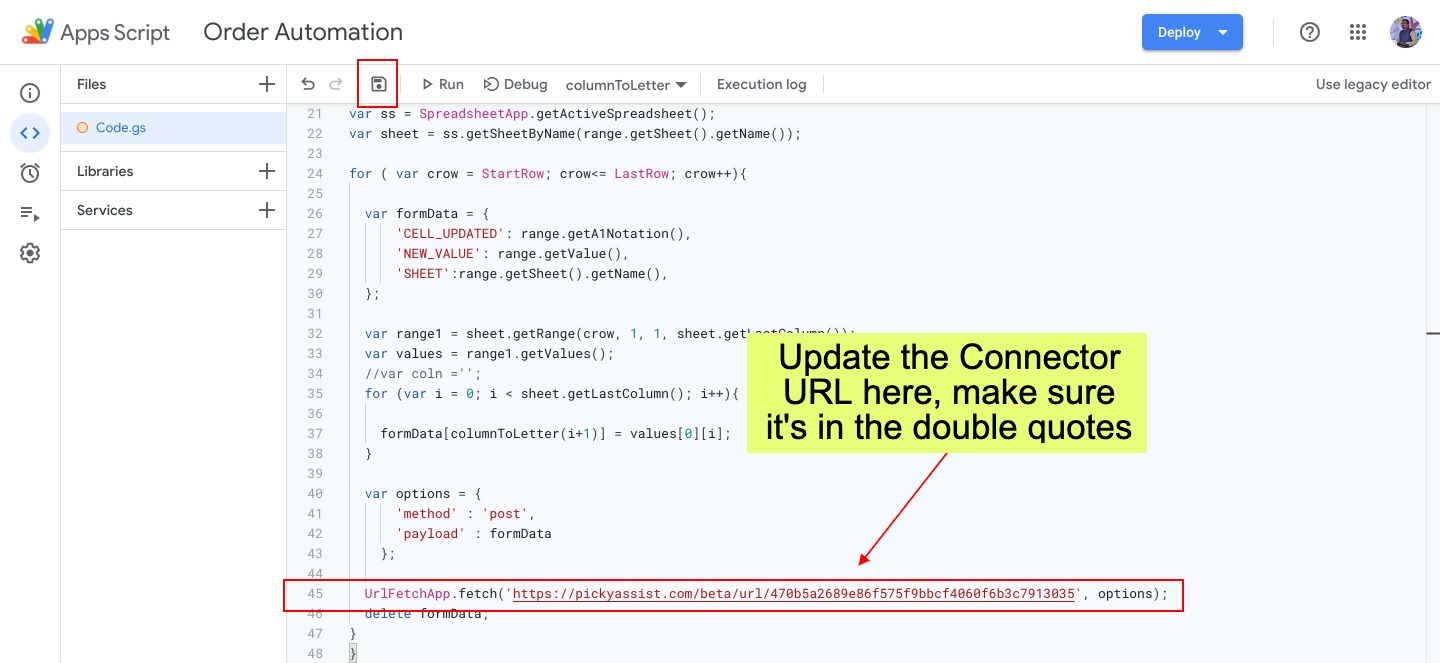
Make sure you have pasted it correctly inside the double quotes
Now Click on the “Save” Icon to Save the Project. You can give any relevant name to the Project to identify it later
Setup Trigger in Google Form
The next step is to Configure the Trigger in the Google Sheet so that every time google will trigger the code when column get edited. To do this select the trigger menu from the left side menu bar and then click on “Add Trigger” then configure it as seen in the below screenshot;
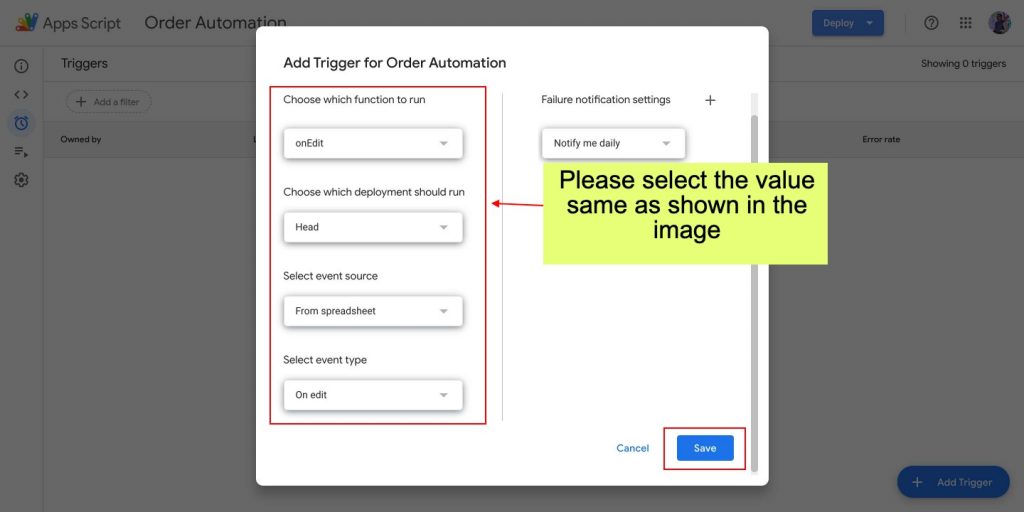
After that click on “Save” button and that’s it
Testing the Integration
Set up the integration by mapping Google Sheets data with Picky Assist Connector to trigger conditions and actions from updates.
Open Google Sheet & Just make any update to Column F so that we get the sample data to the Connector
Go to Picky Assist Connector, open the created connector, and check logs to confirm Google Sheets updates were received.
Mapping the JSON Data Structure
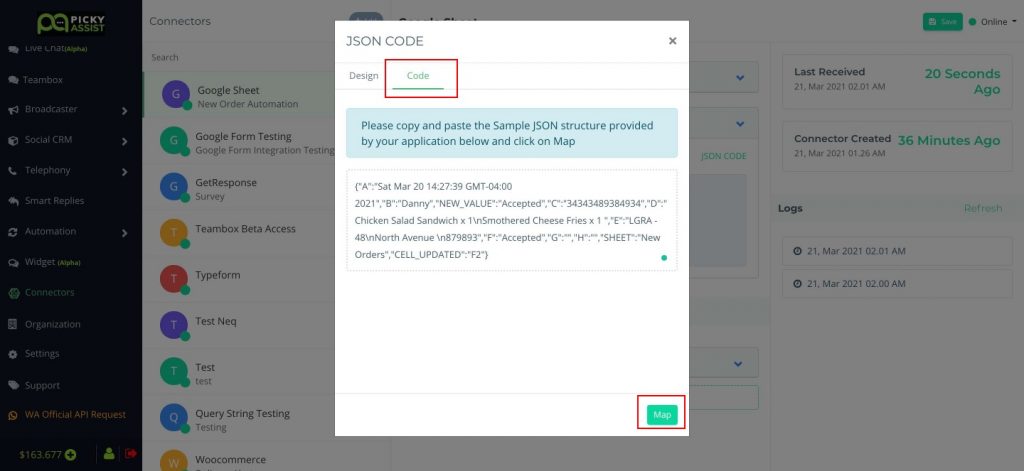
In order to map the JSON data structure go to “Field Mapping” then click on JSON Code from the popup you will able to see something shown as below;

If you are not seeing this option then please click on the “Code” tab then Click on “Map” button as shown below
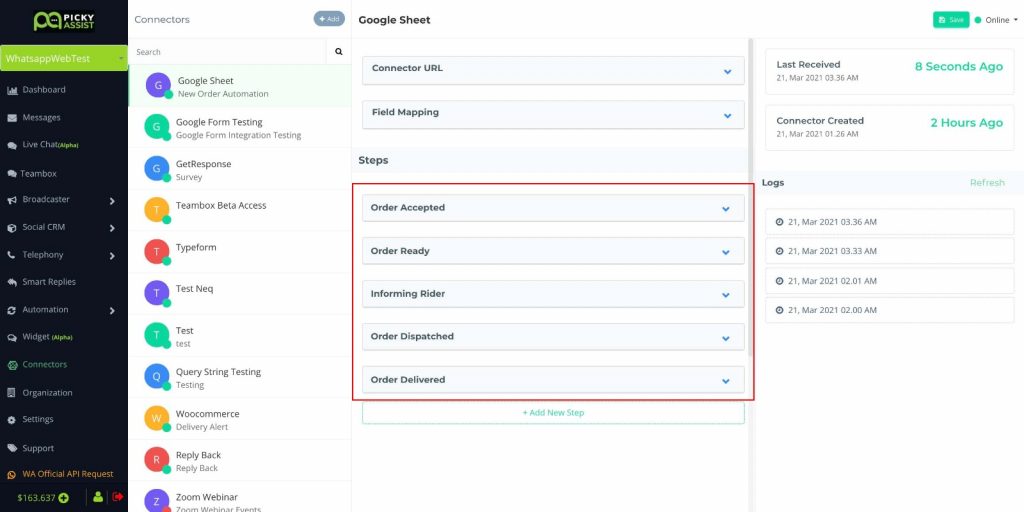
Creating Steps
Now we need to create 6 steps which take different action based on the value in Column F, in order to do this first let’s create one step with all necessary filter and action then duplicate the steps for ease the process,
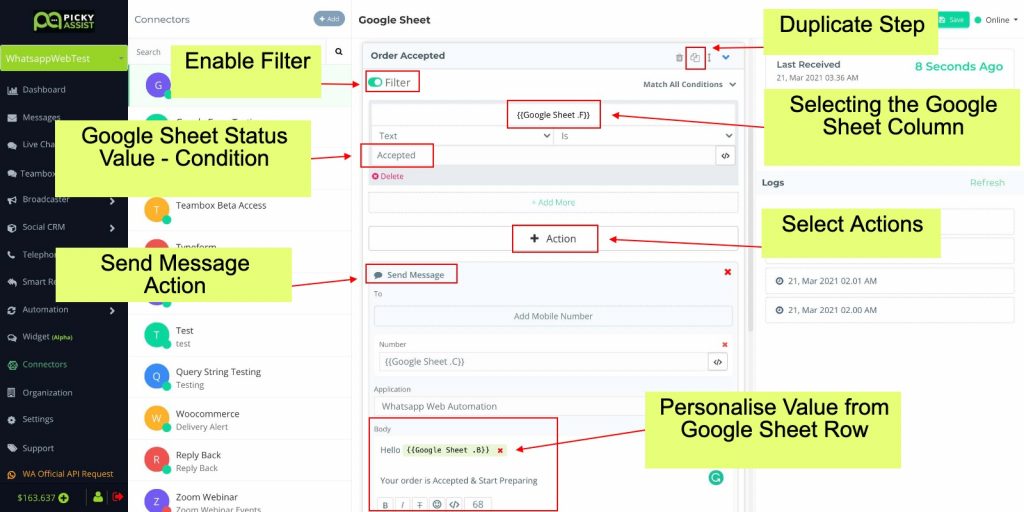
Once a step is configured, we can simply take duplicates of the steps and change the filter condition value and message contents, the final settings will look like this
Now this automation does the following actions when the order status column i.e Column F here changes
- Send a WhatsApp Message to the Customer when the google sheet status column changes to “Accepted”
- Send a WhatsApp Message to the Customer when the google sheet status column changes to “Ready”
- Send a WhatsApp message to the rider informing that there is an order which is ready for delivery when the google sheet status column changes to “Ready”
- Send a WhatsApp Message to the Customer when the google sheet status column changes to “Dispatched”
- Send a WhatsApp Message to the Customer when the google sheet status column changes to “Delivered”
Important Notes
- If you add new columns to your Google Sheet then always make sure you have updated your JSON Code structure and steps accordingly so that you can able to make use of newly available fields in your connector.
- Kindly keep in mind that the target column edit action will trigger for all sheets in a spreadsheet, so if your spreadsheet has more than one sheets then always filter the condition based on the Sheet Name in the Connector in order to avoid wrong trigger / action
- Once a trigger from Google Sheet to Picky Assist happens there is no way to recall it so please be careful while writing conditions and actions in the Connector.
Known Limitations to integrate Google Sheets and WhatsApp
Below are the known limitations of this automation so please keep this in mind while doing the automation;
- There will be no trigger if new rows are added to the sheet
- There will be no trigger if a new row or cell data is added by copy and paste
- There will be no trigger if a new row is created using any other 3rd party platforms (Refer to the solution below)
- There will be no trigger if a data change happens automatically in the background through A custom function, formula, or updates from 3rd party apps (Refer to the solution below)
Workaround & Tips
Below are the possible workarounds for various use cases.
Data Updating from 3rd Party Sites like Zapier
If the data is updating to the google sheet from any 3rd party sources like Zapier, API then this given method will not work as this works only based on the events which are performed by a user manually, for automated events you need to configure the polling i.e in every certain interval you need to lookup for certain data and if matches send the event to the Picky Assist Connector, you may refer the code and instructions here.
Sending Mass Messages from Google Sheet
The current integration doesn’t natively provide an option to send mass messages however you can try the following workarounds to achieve this;
The recommended method is to export the worksheet as csv and use the Picky Assist broadcaster feature to send personalised messages
If you can’t do this process then you can create any keyword like “SendMsg” in the column then create a filter and action for the keyword in the Connector, you can setup the Send Message action which enables you to send a specific message when the keyword is updated in the Column.
You can drag and drop the values from one cell to another to send bulk messages (this method is recommended only if you have less than 100 messages at a time) using this method for more rows will lead to missing messages due to the throttle limit of 5 triggers per second.