This article demonstrate how you can send WhatsApp message from google sheet and once the message is submitted to Picky Assist then update a value back to the google sheet specified column.
This script is mainly used to solve following cases;
- If the google sheet is updated from any other 3rd party applications like Zapier or any update which are not performed by a user then trigger a WhatsApp message. (Google Scripts which we have published will work only if the value is updated by a human)
- Sending bulk messages (30 messages per minute) from google sheet based on certain values becomes true, for example from a list of records you want to send messages only to few selected records
Google Script
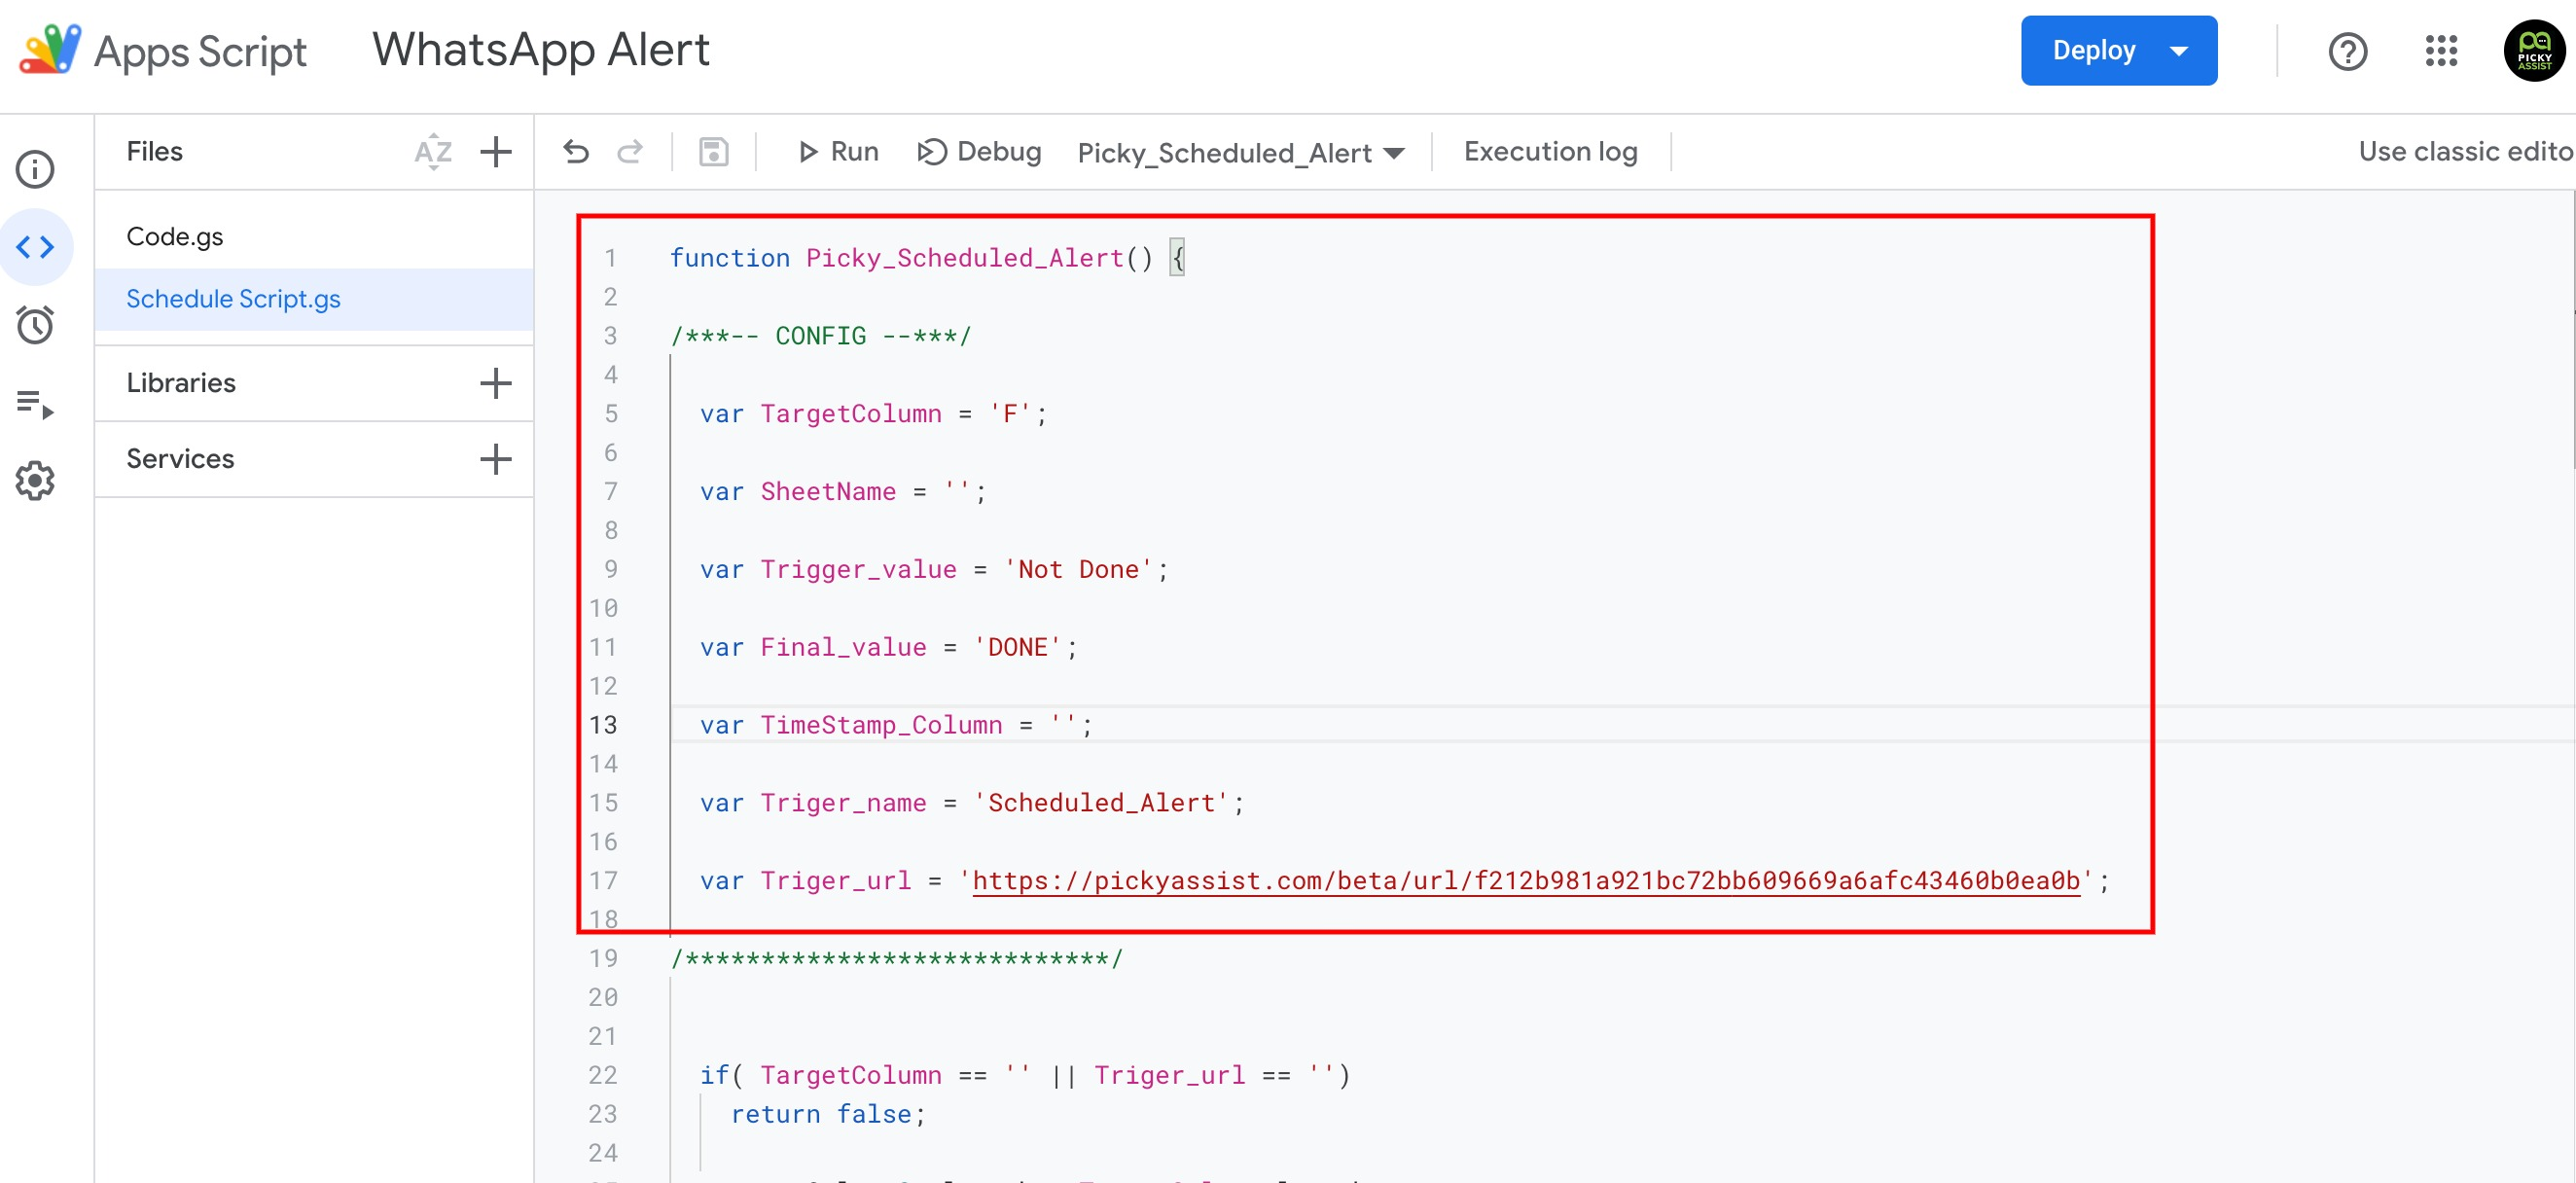
Make Changes for the values which are shown under “CONFIG”
function Picky_Scheduled_Alert() {

/***-- CONFIG --***/

	var TargetColumn = 'J';

	var SheetName = '';

	var Trigger_value = '';

	var Final_value = 'DONE';

        var TimeStamp_Column = '';

	var Triger_name = 'Scheduled_Alert';

	var Triger_url = 'https://webhook.site/44757124-5c2a-4c41-a63f-7a138b914ce8';

/****************************/


	if( TargetColumn == '' || Triger_url == '')
		return false;

	var tarCol = 0, length = TargetColumn.length;

	for (var i = 0; i < length; i++)
	{
		tarCol += (TargetColumn.charCodeAt(i) - 64) * Math.pow(26, length - i - 1);
	}

  var TimeStamp_Col = -1;

  var time_stamp = '';

  if( TimeStamp_Column != '' ){

    	var TimeStamp_Col = 0, length = TimeStamp_Column.length;

      for (var i = 0; i < length; i++)
      {
        TimeStamp_Col += (TimeStamp_Column.charCodeAt(i) - 64) * Math.pow(26, length - i - 1);
      }


      var timeZone = SpreadsheetApp.getActiveSpreadsheet().getSpreadsheetTimeZone();

      var tarDate = new Date();

      time_stamp  = tarDate.toLocaleString("en-US", {timeZone: timeZone})

  }


	if( SheetName == '')
		var sheet = SpreadsheetApp.getActive().getSheets()[0];
	else
		var sheet = SpreadsheetApp.getActive().getSheetByName(SheetName);


	var startRow = 1;
	var lastRow = sheet.getLastRow();
	var lastCloumn = sheet.getLastColumn()


	for (var i =startRow ; i <= lastRow; i++) {

		var c_val = sheet.getRange(i, tarCol).getValue();
		//Logger.log(c_val);

		try{

			if( c_val == Trigger_value ){

				Logger.log("TRIGGER VALUE FOUND:", c_val);


				var formData = {
						'triger_name': Triger_name
				};

				var range1 = sheet.getRange(i, 1, 1, lastCloumn);
				var values = range1.getDisplayValues();

				for (var j = 0; j < sheet.getLastColumn(); j++){

					var temp, letter = '';

					var column = j+1;

					while (column > 0) {
						temp = (column - 1) % 26;
						letter = String.fromCharCode(temp + 65) + letter;
						column = (column - temp - 1) / 26;
					}

					formData[letter] = values[0][j];

				}

				var options = {
						'method' : 'post',
						'payload' : formData
					};

				UrlFetchApp.fetch(Triger_url, options);
				delete formData;


				sheet.getRange(i, tarCol).setValue(Final_value);


        if( TimeStamp_Col > -1 ){
          sheet.getRange(i, TimeStamp_Col).setValue(time_stamp);
        }

			}

		}catch(err) {
			continue;
		}

	}

}
Now we need to update the values from line number 5 to 17 as per different requirements, below are the descriptions
See the below areas i.e 5 to 15 lines where you need to make changes as per your requirements.
| Fields | Description |
| var TargetColumn = ‘D’; | Here you need to select the column name the script should lookup for the value |
| var SheetName = ‘ ‘; | If you have more than 1 sheet then please specify the sheet name here |
| var Trigger_value = ‘ ‘; | This the value you need to setup in the sheet in the specified column, for example if you set as “Send” then the script will pick the columns containing “Send” text and send the details to the Picky Assist Connector |
| var Final_value = ‘DONE’; | This is the value which needs to be updated back to the google sheet column so that the script don’t process the row again, you can add any values here and the same will be updated back when the script sends the informations to the connector for processing it |
| var TimeStamp_Column = ‘ ‘; | This is an optional settings if you would like know at what time the record was send to the Picky Assist connector for processing then you can create a new column in your google sheet and specify the column name here. When the script read the data the time get updated to this field so that you can know that this was the last time that specific row details send to the Picky Assist Connector |
| var Triger_name = ‘alert’; | You can give a name to the trigger which helps you to identify from which function the data is getting passed to the Picky Assist Connector so that you can set up the automation rules accordingly, useful when you have more than one function in a sheet. |
| var Triger_url = ‘https://pickyassist.com/beta/url/e96ad4’; | This is where you need to copy and paste the Connector URL |
Setup Trigger in Google Form
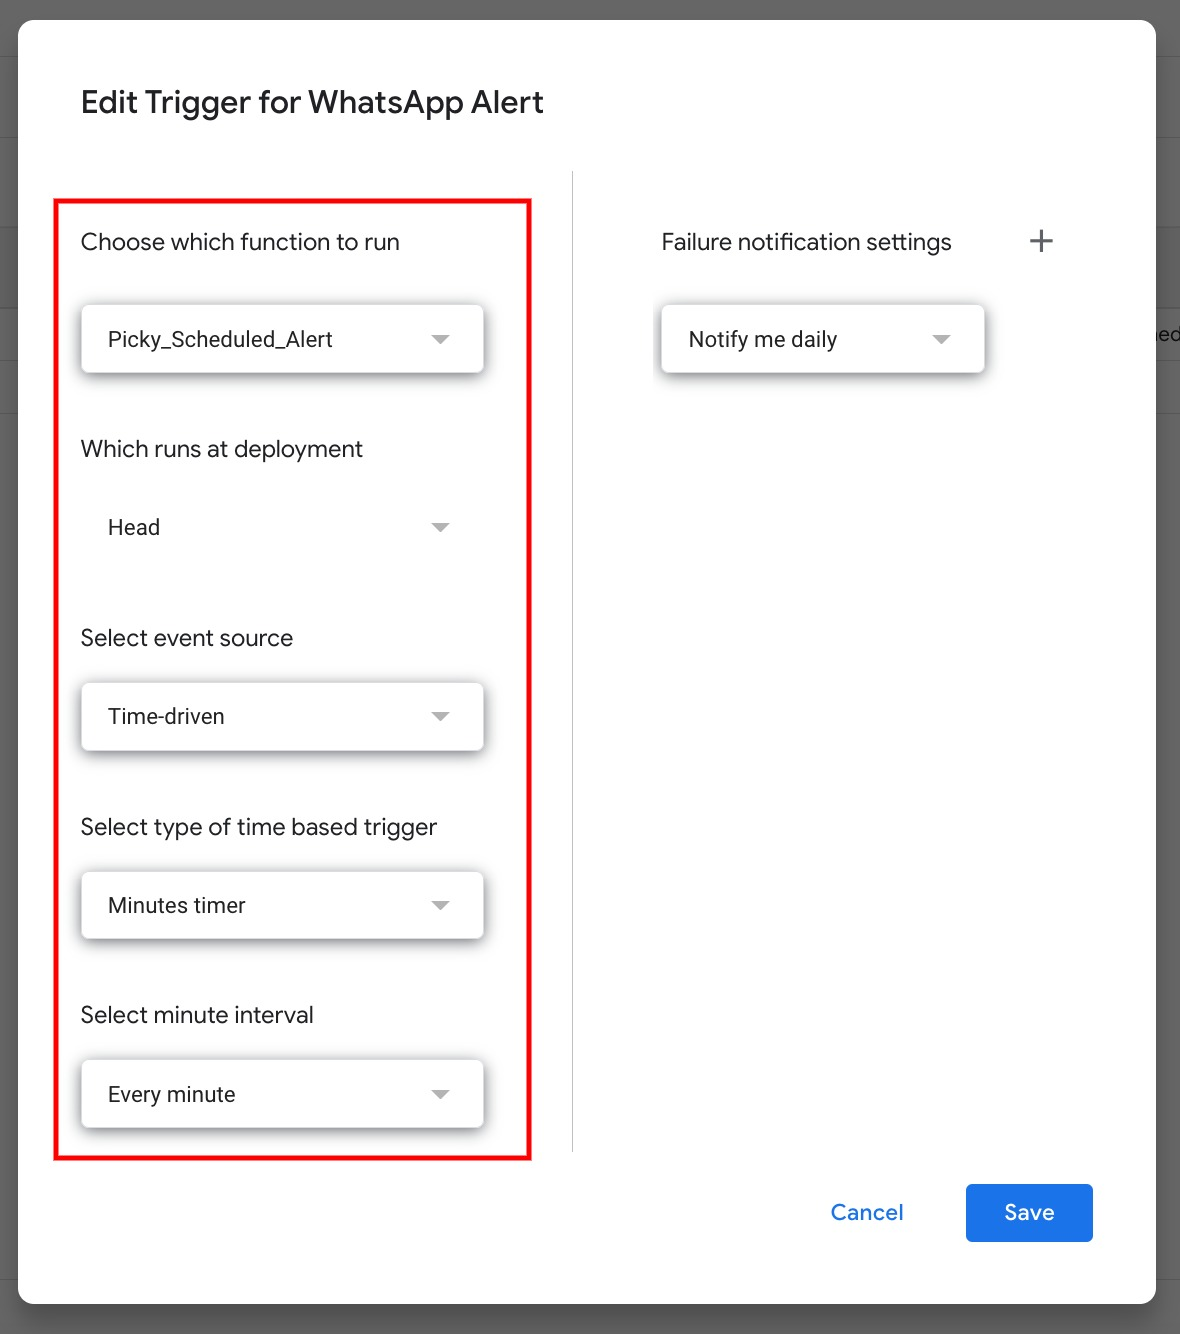
The next step is to Configure the Trigger in the Google Sheet so that every time google will trigger the code as per the schedule you configured, to do this select the trigger menu from the left side menu bar and then click on “Add Trigger” then configure it as seen in the below screenshot;
| Variables | Description |
| Choose which function to run | You have to select “Picky_Scheduled_Alert” if you have only one function, you have the option to duplicate the function by giving a different name to the function and once it’s done you will able to see those functions in the drop down, this is useful if you have multiple functions in a script |
| Which Runs at Deployment | Always make sure it’s selected as “Head” |
| Select Event Source | Always make sure it’s “Time Drive” |
| Select type of time based trigger | This is where you will get below options to select when the script needs to be run, if you would like to check for changes in every minutes then select the timer as “Minutes” recommended 10 minutes interval Specific date and time Minutes Timer Hour Timer Day Timer Week Timer Month Timer |
| Select minute interval | Based on the above selection we will see different options, since we selected “Minute Timer” now we need to select the minutes in which the trigger should execute Highly recommend to setup as 5 minutes interval so every 5 minutes the script will check for changes and if new changes are found then it execute the script and send details to the Picky Assist Connector. |
After that click on “Save” button and that’s it
Testing the Integration
Now to setup the integration we need to map the Google Sheet data with Picky Assist Connector so that it can perform conditions and actions based on the data received from the Google Sheet.
Open the Google Sheet and change the value in the targeted column, then go to Script Editor from Extensions -> App Scripts and click on “Run Icon” to run the script as shown below;

Go to your Picky Assist Account then navigate to Connector, select the connector which was created for this Google Sheet then in the left sidebar you will able to see logs, this means Google notified the Picky Assist for the new update in the column.
Mapping the JSON Data Structure
In order to map the JSON data structure go to “Field Mapping” then click on JSON Code from the popup you will able to see something shown as below;
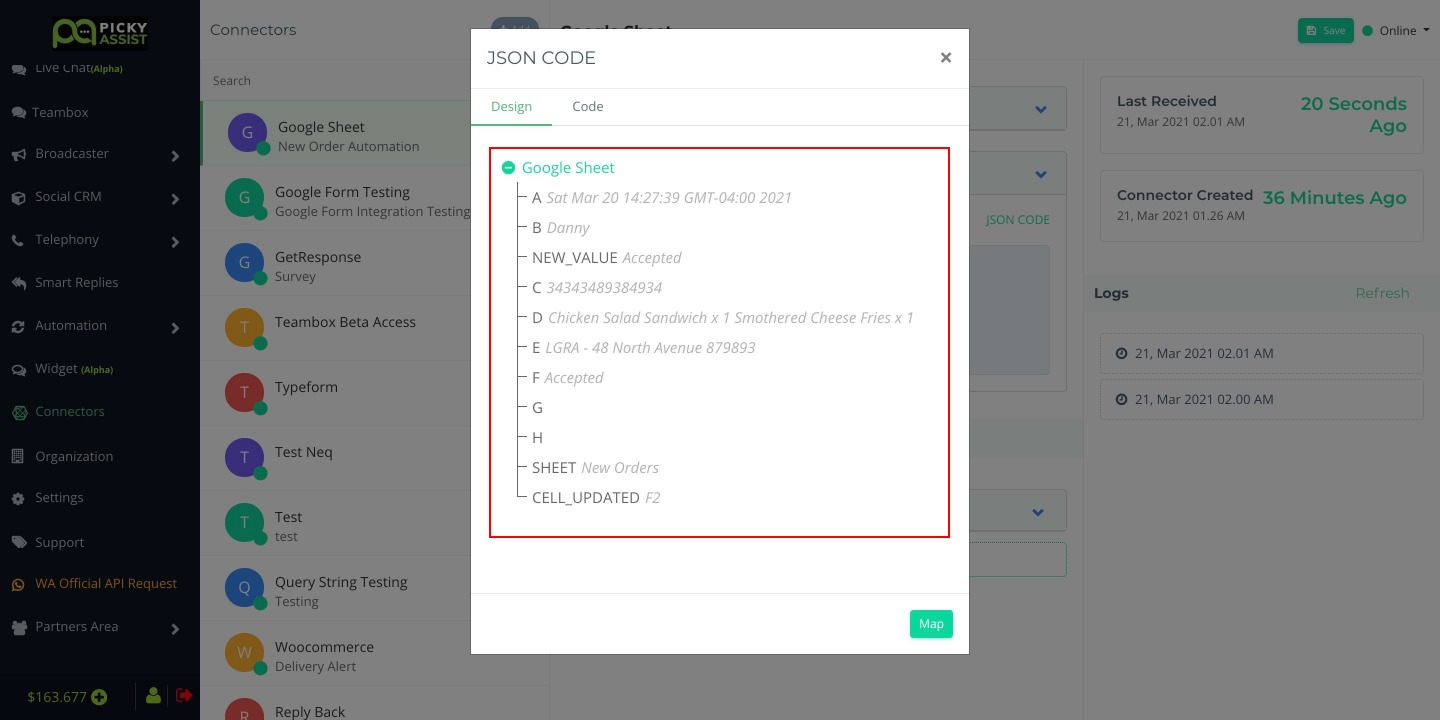
If you are not seeing this option then please click on the “Code” tab then Click on “Map” button as shown below

Creating Steps
Now we need to create steps which take different action based on the value in the google sheet, in order to do this first let’s create one step with all necessary filter and action then duplicate the steps for ease the process,

Once a step is configured, we can simply take duplicates of the steps and change the filter condition value and message content


Add comment