In this blog, we are going to explore the possibilities of integrating WhatsApp with Shopify using Picky Assist Connector.
Pre-Requisite
- WhatsApp Channel Enabled Picky Assist Account
- Shopify Account with Admin Privileges
About Shopify
Shopify is a commerce platform that allows anyone to set up an online store and sell their products. Merchants can also sell their products in person with Shopify POS.
Capabilities with Picky Assist Connector
When you connect your Shopify store with Picky Assist Connector you can achieve below mentioned capabilities to enhance your communication with your customer’s
Primarily you will able to take actions/perform condition in the Picky Assist Platform when any of the below events happens in your Shopify site, below are the list of events Shopify Supports now
- app/uninstalled
- carts/create
- carts/update
- checkouts/create
- checkouts/delete
- checkouts/update
- collection_listings/add
- collection_listings/remove
- collection_listings/update
- collections/create
- collections/delete
- collections/update
- customer_groups/create
- customer_groups/delete
- customer_groups/update
- customer_payment_methods/create
- customer_payment_methods/revoke
- customer_payment_methods/update
- customers/create
- customers/delete
- customers/disable
- customers/enable
- customers/update
- disputes/create
- disputes/update
- domains/create
- domains/destroy
- domains/update
- draft_orders/create
- draft_orders/delete
- draft_orders/update
- fulfillment_events/create
- fulfillment_events/delete
- fulfillments/create
- fulfillments/update
- inventory_items/create
- inventory_items/delete
- inventory_items/update
- inventory_levels/connect
- inventory_levels/disconnect
- inventory_levels/update
- locales/create
- locales/update
- locations/create
- locations/delete
- locations/update
- order_transactions/create
- orders/cancelled
- orders/create
- orders/delete
- orders/edited
- orders/fulfilled
- orders/paid
- orders/partially_fulfilled
- orders/updated
- product_listings/add
- product_listings/remove
- product_listings/update
- products/create
- products/delete
- products/update
- profiles/create
- profiles/delete
- profiles/update
- refunds/create
- shop/update
- subscription_billing_attempts/failure
- subscription_billing_attempts/success
- subscription_contracts/create
- subscription_contracts/update
- tender_transactions/create
- themes/create
- themes/delete
- themes/publish
- themes/update
How It Works?
Picky Assist Connector makes use of the Shopify inbuilt Webhook module to listen the real-time event alerts from the site and then based on the event type you will able to create a filter and relevant action to be taken.
| Event | Filter | Action |
| Order Update | Create Update Delete | Send WhatsApp Message Add A Tag or Category Assign an Agent in Teambox |
| Product | Create Update Delete | Keep the Customer informed via WhatsApp message when a new product is added or an out-of-stock becomes available again. |
Getting Started
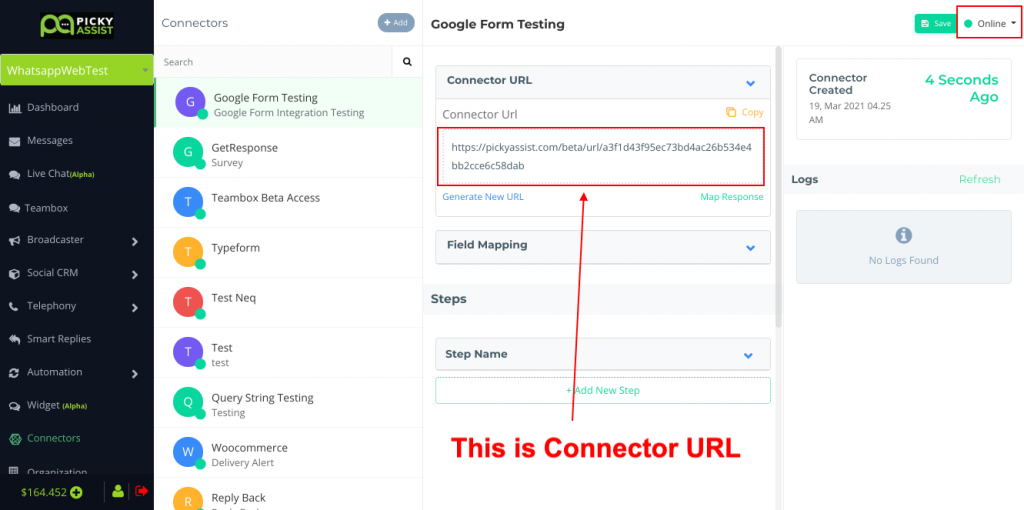
The first step is to go to Picky Assist and create a Connector URL, just make sure the Connector is in Online Mode to start accepting requests from Shopify whenever the subscribed event is triggered.
Setup Webhook in Shopify
The next step is to login into your Shopify Admin site then navigate to Settings -> Notifications -> Webhooks as shown below;
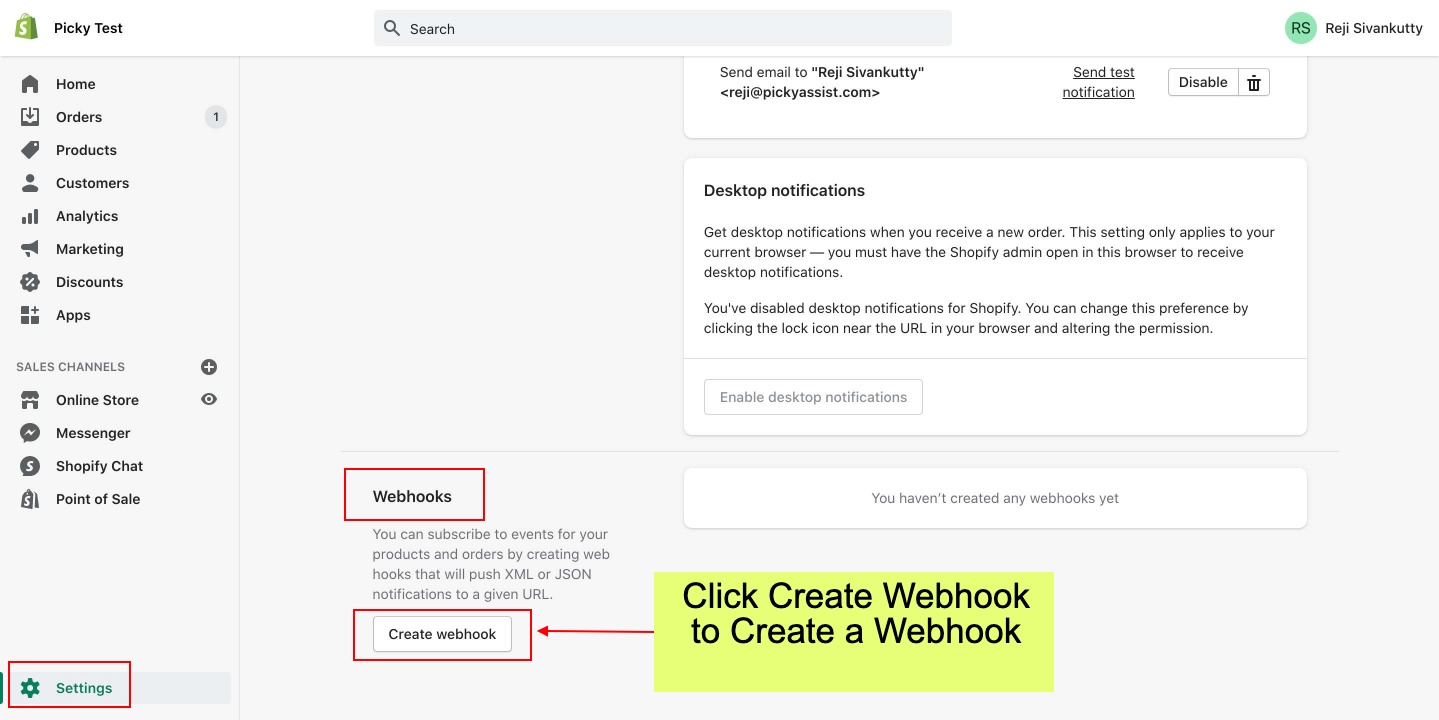
Creating Webhook
Now, we need to create a webhook for getting an order update, i.e whenever an order status is updated Shopify will notify the Picky Assist Connector about the event and the Connector will perform the steps configured by you.
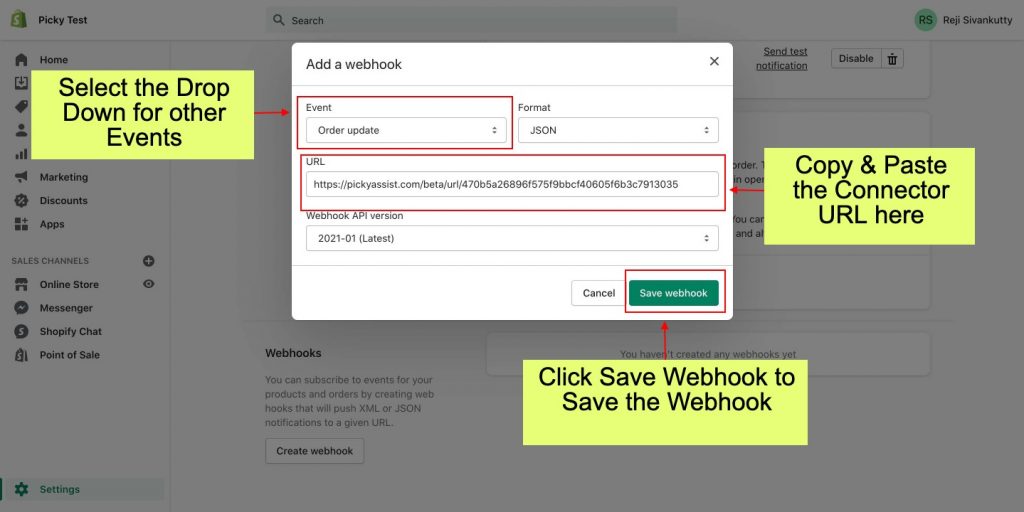
You can subscribe to multiple shopify events by creating more webhooks with same Connector URL or different Connector URL and make use of the Filter tool & Router to filter the event value and route to the right step or connector in the Picky Assist Connector as per your requirments.


Add comment