
In this article we will demonstrate how to Integrate WordPress.org (Self Hosted) with WhatsApp through Picky Assist Connector
Pre-Requisite
- WhatsApp Channel Enabled Picky Assist Account
- Access to Picky Assist Connector
- WordPress Site with Admin Login
About WordPress
WordPress is an excellent website platform for a variety of websites. From blogging to e-commerce to business and portfolio websites, WordPress is a versatile CMS. Designed with usability and flexibility in mind, WordPress is a great solution for both large and small websites.
According to usage statistics of content management systems now report that WordPress powers over 60 million websites, or 36% of all websites on the internet and over 60% of all websites whose content management systems are known.
Capabilities with Picky Assist Connector
When you connect your WordPress Blog with Picky Assist Connector you can achieve below-mentioned capabilities to enhance the business communication with your customer’s
- Automatically Send A WhatsApp Message to A Group of Users whenever a new blog is published, for example when a new blog is posted in the technology category send a WhatsApp message only to the users who are opt to receive technology news updates from you.
- Automatically Alert an Internal User in the WordPress when a Post Status Changed.
- Automatically Post New Blogs to many WhatsApp Groups or create advanced filter to post only to certain groups based on the blog post category or tag
- Send WhatsApp Messages to one to one using the Broadcaster feature
Type of Events Supported
Following types of events are supported from WordPress Blog to Picky Assist Connector i.e you have the option to setup an automation whenever any of these events are happening in your WordPress Site.
Post
- Post added
- Post saved as a draft
- Post sent for review
- Post approved
- Post published
- Post trashed
- Post updated
- Post scheduled
Comment
- Comment added
- Comment approved
- Comment replied
- Comment spammed
- Comment trashed
- Comment unapproved
- Comment published
User
- User deleted
- User login
- User login failed
- User logout
- User password changed
- User password reset request
- User profile updated
- User registered
- User role changed
Media
- Media added
- Media trashed
- Media updated
Plugin
- Plugin activated
- Plugin deactivated
- Plugin installed
- Plugin removed
- Plugin updated
Theme
- Theme installed
- Theme switched
- Theme updated
Personal Data
- Personal Data erased
- Personal Data erase request
- Personal Data exported
- Personal Data export request
Taxonomy
- Taxonomy term created
- Taxonomy term deleted
- Taxonomy term updated
How It Works?
Picky Assist Connector makes use of a 3rd party Webhook Plugin called “Notification” (Open Source & Free to Use) to trigger the Webhook whenever an event happens in your WordPress Blog, it will reach the Picky Assist Connector and further you will able to automate the way you needed using Filters, Steps, Formatter & Actions.
Getting Started
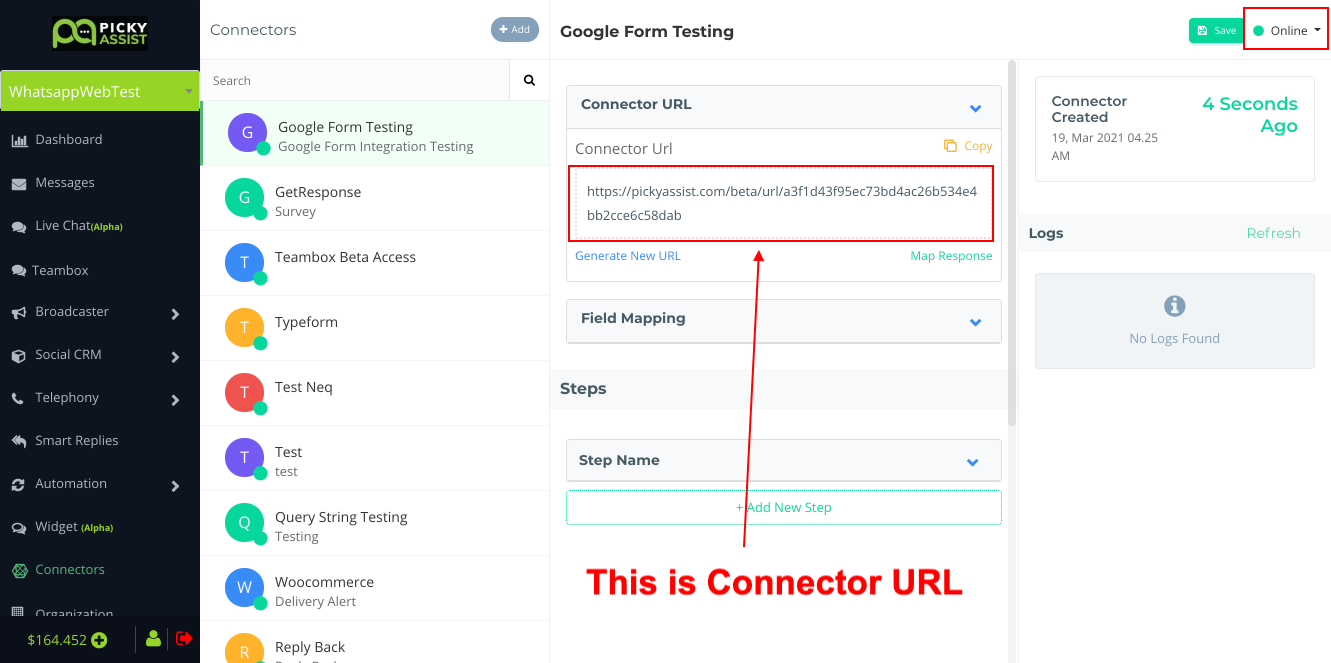
The first step is to go to Picky Assist and create a Connector URL, just make sure the Connector is in Online Mode to start accepting requests from WordPress Blog whenever the subscribed event is triggered.
Installing the 3rd Party Plugin “Notifications”
We will be using a 3rd party open source free plugin called “Notifications” to trigger the webhook events from the WordPress Blog to Picky Assist Connector, so you can install the plugin from your WordPress Plugins menu by searching “Notifications” or you can download and upload the plugin using this link. Download Notification Plugin
Setting Up the Notifications (Webhook)
Once the plugin in installed and activated, you need to create a notification which can trigger a Webhook to Picky Assist Connector, to do this go to the Plugin then “Add New Notification” and follow the steps as shown in the below video;
Testing the Integration
Once the Webhook is configured, you need to perform a test action in order to receive the data structure to Picky Assist Connector from your WordPress blog so that you will able to map the details like Post Title, Post URL etc and perform steps for automation in Picky Assist Connector
If the automation is setup for the all new blog post’s then just create a new blog and publish it then go to your Connector and Map the Values and start creating Steps, Filters, Actions, Formatters as per the below references guides
References
- Creating Steps in Picky Assist Connector
- Creating Filters in Picky Assist Connector
- Setting Up Action in Picky Assist Connector
- Setting Up Formatter in Picky Assist Connector
Getting OPT-IN from Subscribers
The best way is to create an OPT-IN using Picky Assist Smart Replies by asking them to send a message to your WhatsApp Number is a specified format like
OPT BLOG TECH
You can also manually upload a list of contacts into Picky Assist Social CRM but this method is not recommended if the user never interacted with your WhatsApp number earlier.
Getting OPT-IN with Smart Replies
You can also define different keywords in the Smart Replies which allows users to subscribe into multiple topics which they are interested like tech, health, beauty etc so you will able to send highly personalized contents based on each users interest. Make use of Smart Actions to automatically Add Subscribers into Various Segments which helps you to select the Segment to Automatically Broadcast WhatsApp messages.
Placing a WhatsApp Widget
Placing a WhatsApp Icon or Widget in your blog or website is a good idea to get OPT-IN for this you can use any of the free WhatsApp Widget plugins for WordPress and put the Smart Replies Direct Link as Call to Action
Posting New Blog Update Automatically Into WhatsApp Groups
If you have existing WhatsApp Groups then it’s also possible to post your blog updates to all the WhatsApp Groups or Selected WhatsApp Groups automatically. You need to setup Action in your Connector to do this.
Please be noted when you are using WhatsApp Web Automation as a Channel then please mind the message sending speed and number of subscribers, you may not able to scale the service beyond certain limits. Sending too many messages to unknown contact may lead to blockage of your WhatsApp number so use this feature at your own risk.


Add comment